 Our first app, Migrato, is live on the Shopify App Store

Import / Export Products
Product Import/Export (with Variants, Inventory, Images, Metadata, etc.)
Migrato allows you to import and export Shopify products in bulk using CSV or Excel (XLSX) files.
You can manage product information including products, variants, inventory, prices, images, SEO data, metafields, and other supported product information from a single import or export process.
This guide explains how to import and export products using Migrato.

Export Products
You can use Migrato to export your Shopify product data to a CSV or XLSX file.
Step 1: Select Products
From your Shopify Admin:
- Go to Apps → Migrato.
- Open the Export section.
- Select file Format as Excel or CSV.
- Select Products as the data type.
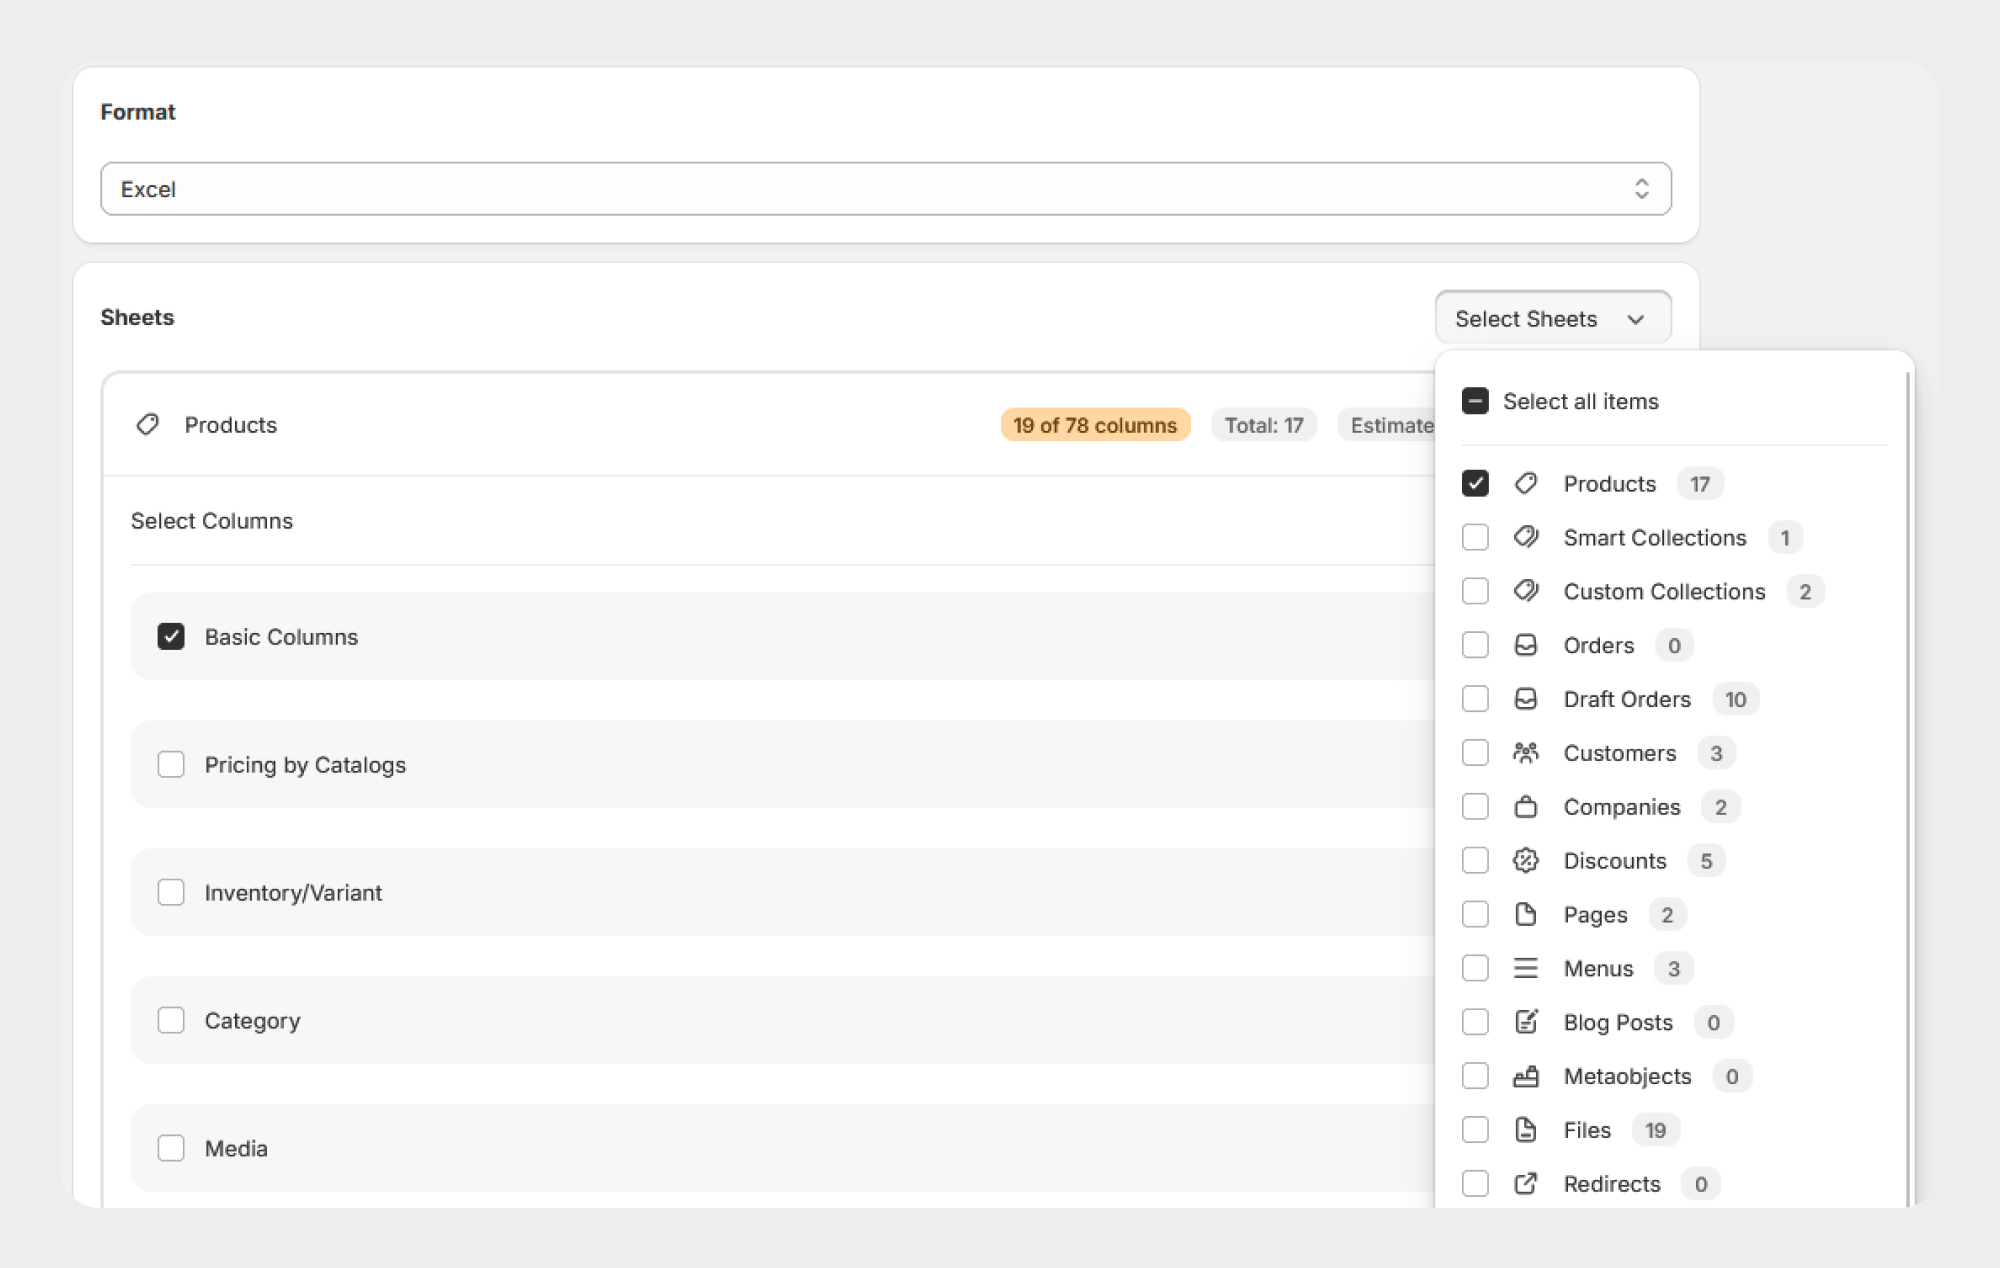
Step 2: Select Export Fields
After selecting Products & choose the product fields you want to include in the export.
You can export the available product information, including supported: Product IDs, Handles, Variants, SKU, Price, Compare-at price, Inventory, Images, Product status, Tags, Vendor, Product type, SEO information, Metafields, Other supported product data.
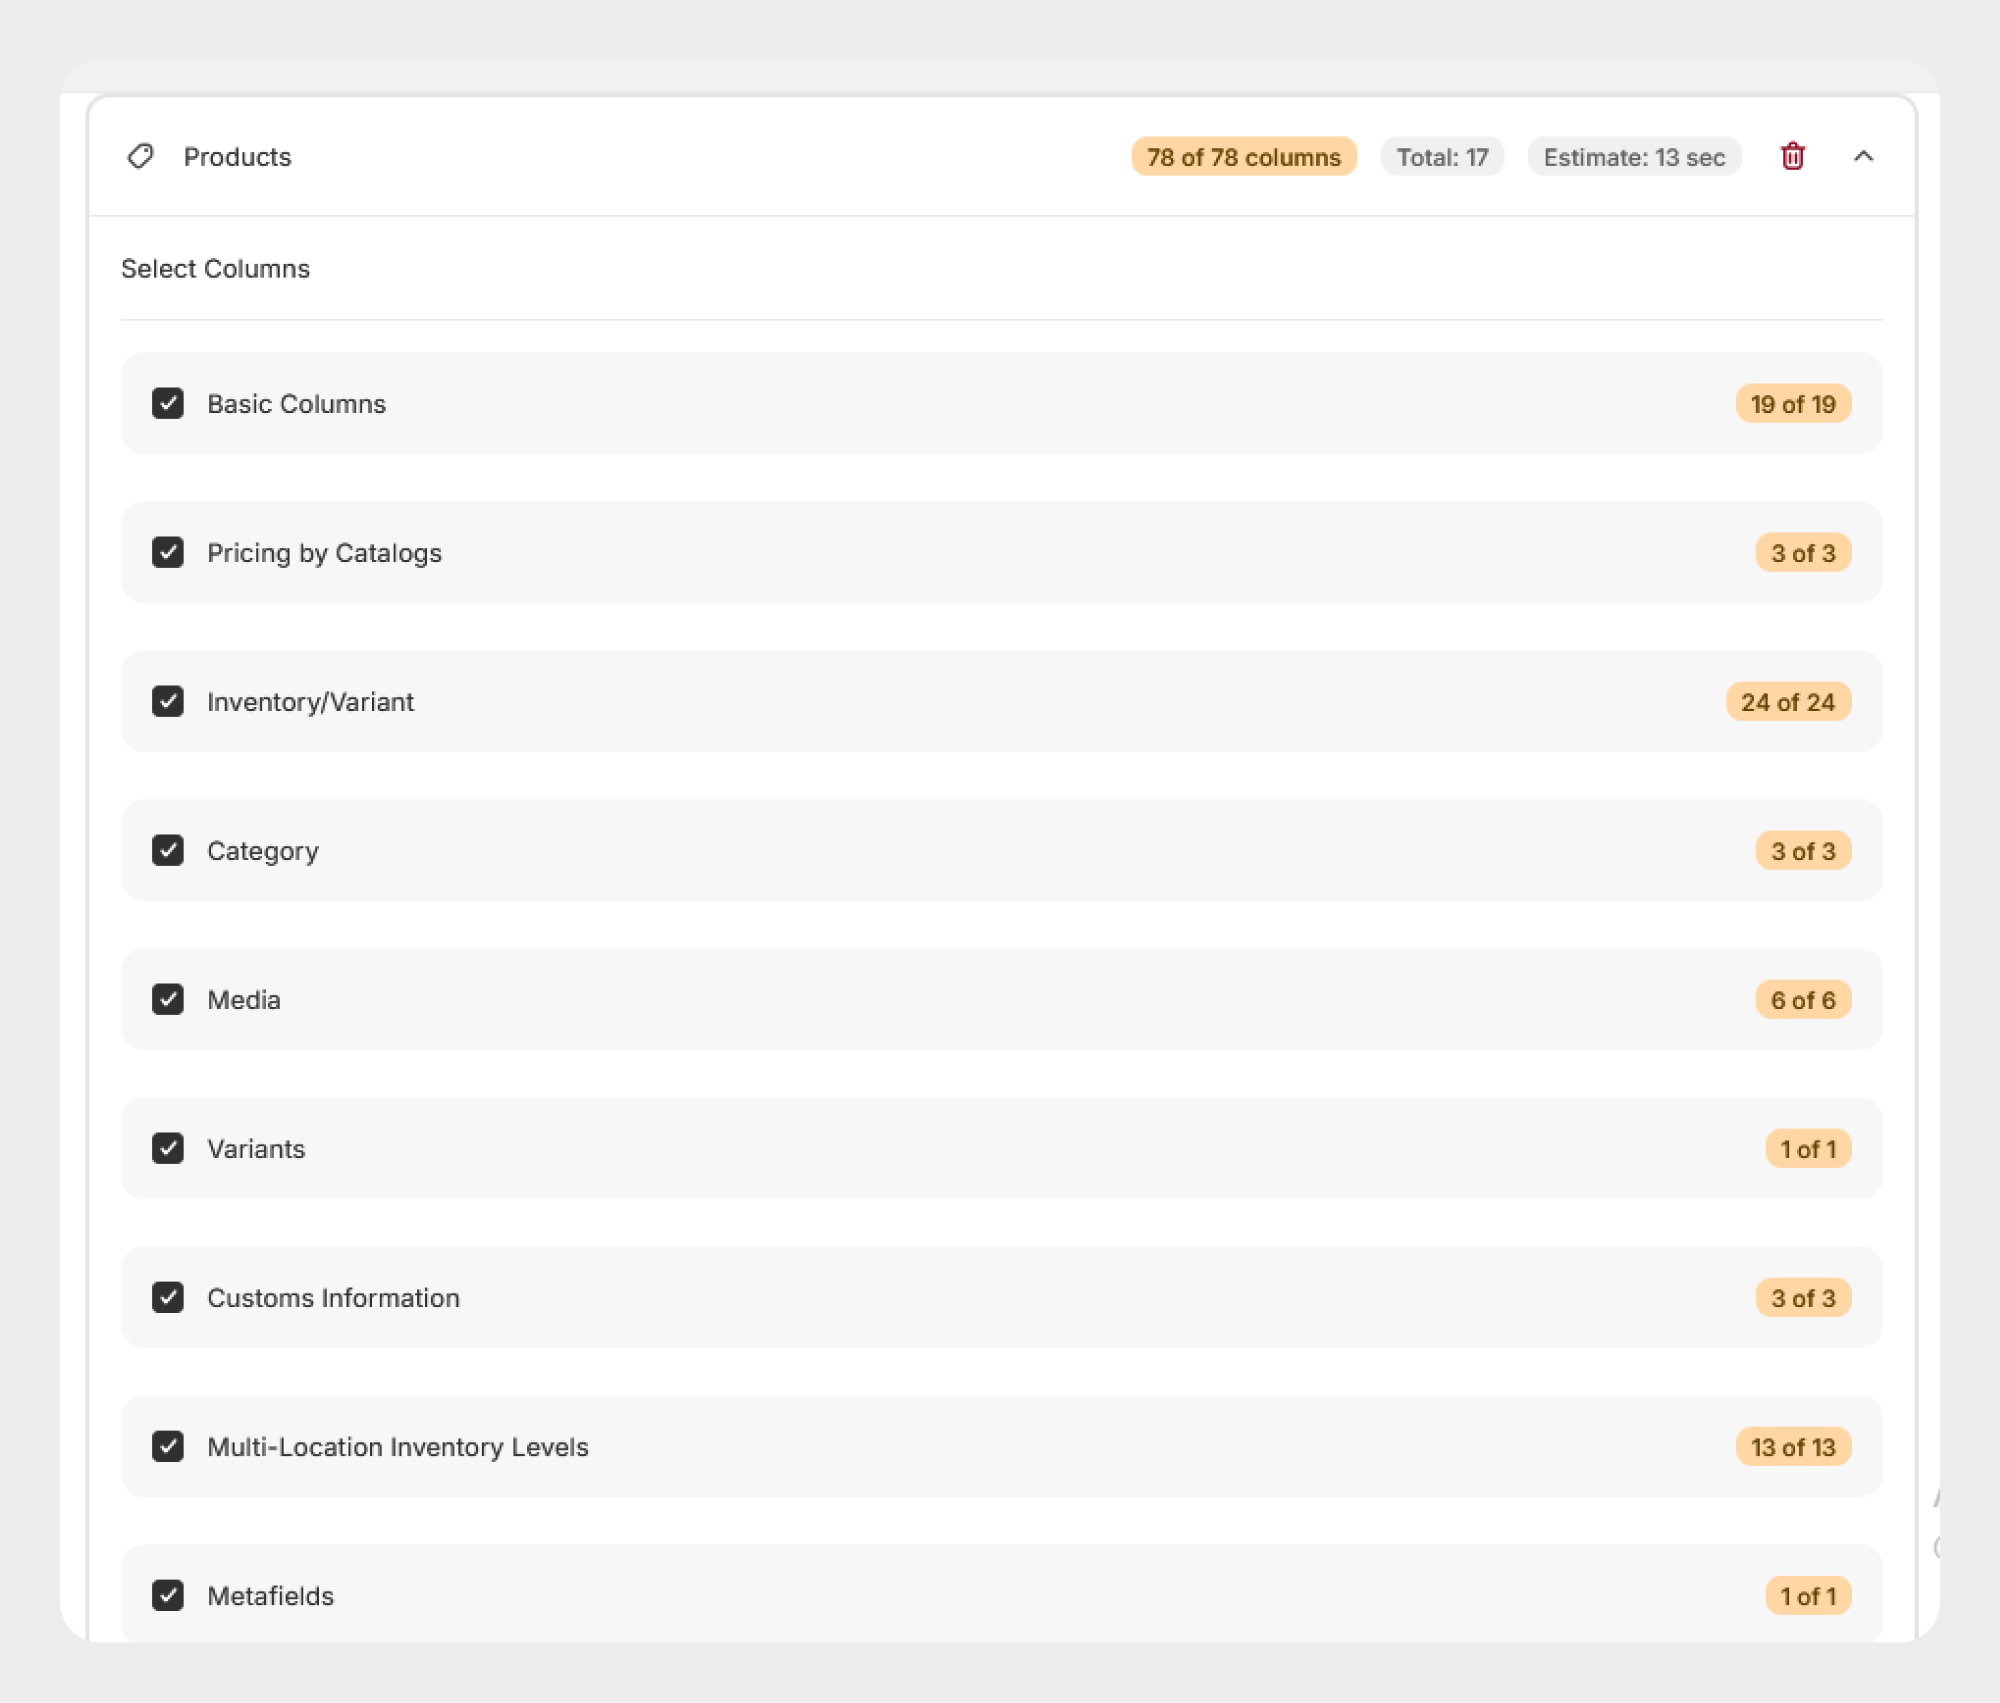
You can select the fields required for your export instead of exporting every available field.
The available fields depend on the product data supported by Migrato and Shopify.
For a complete list of product fields, see Product Template Documentation.
Step 3: Apply Product Filters
Migrato allows you to apply filters when exporting products so you can export only the products that match your requirements.
For example, you can use the available filters to select specific products based on supported product information.
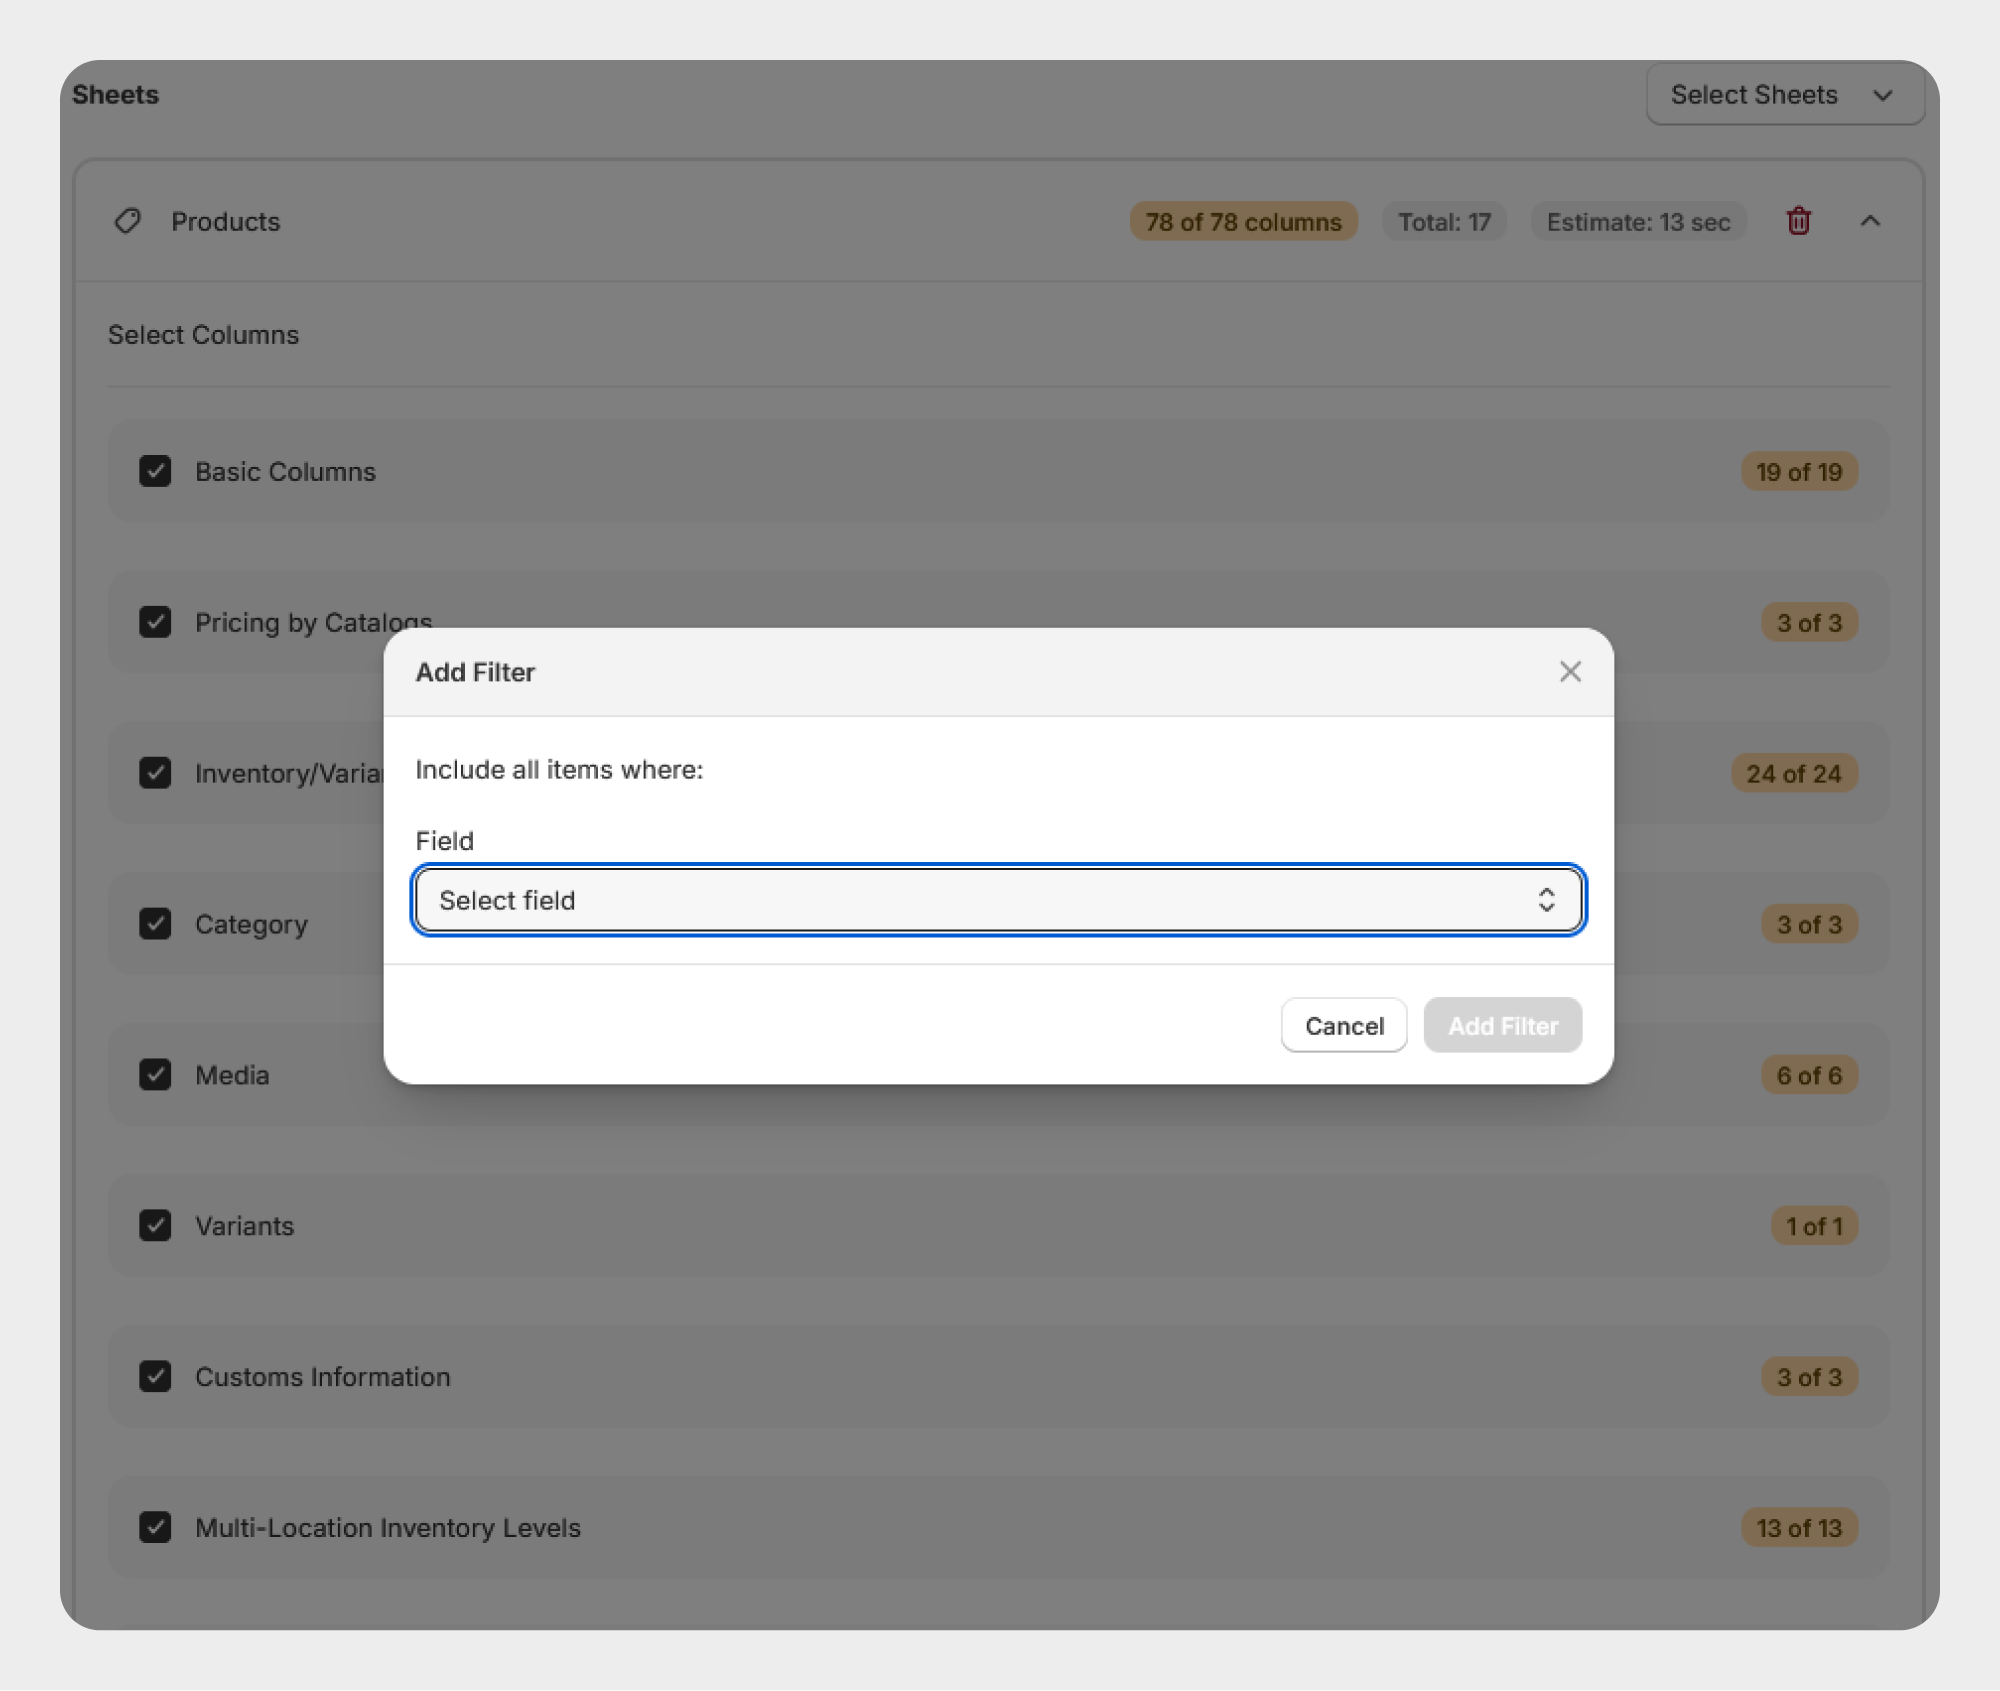
Filters are especially useful when working with large product catalogs and when you do not need to export the entire catalog.
For more information, see Filter Products.
Step 4: Select the File Format
Choose the required export format: CSV or XLSX
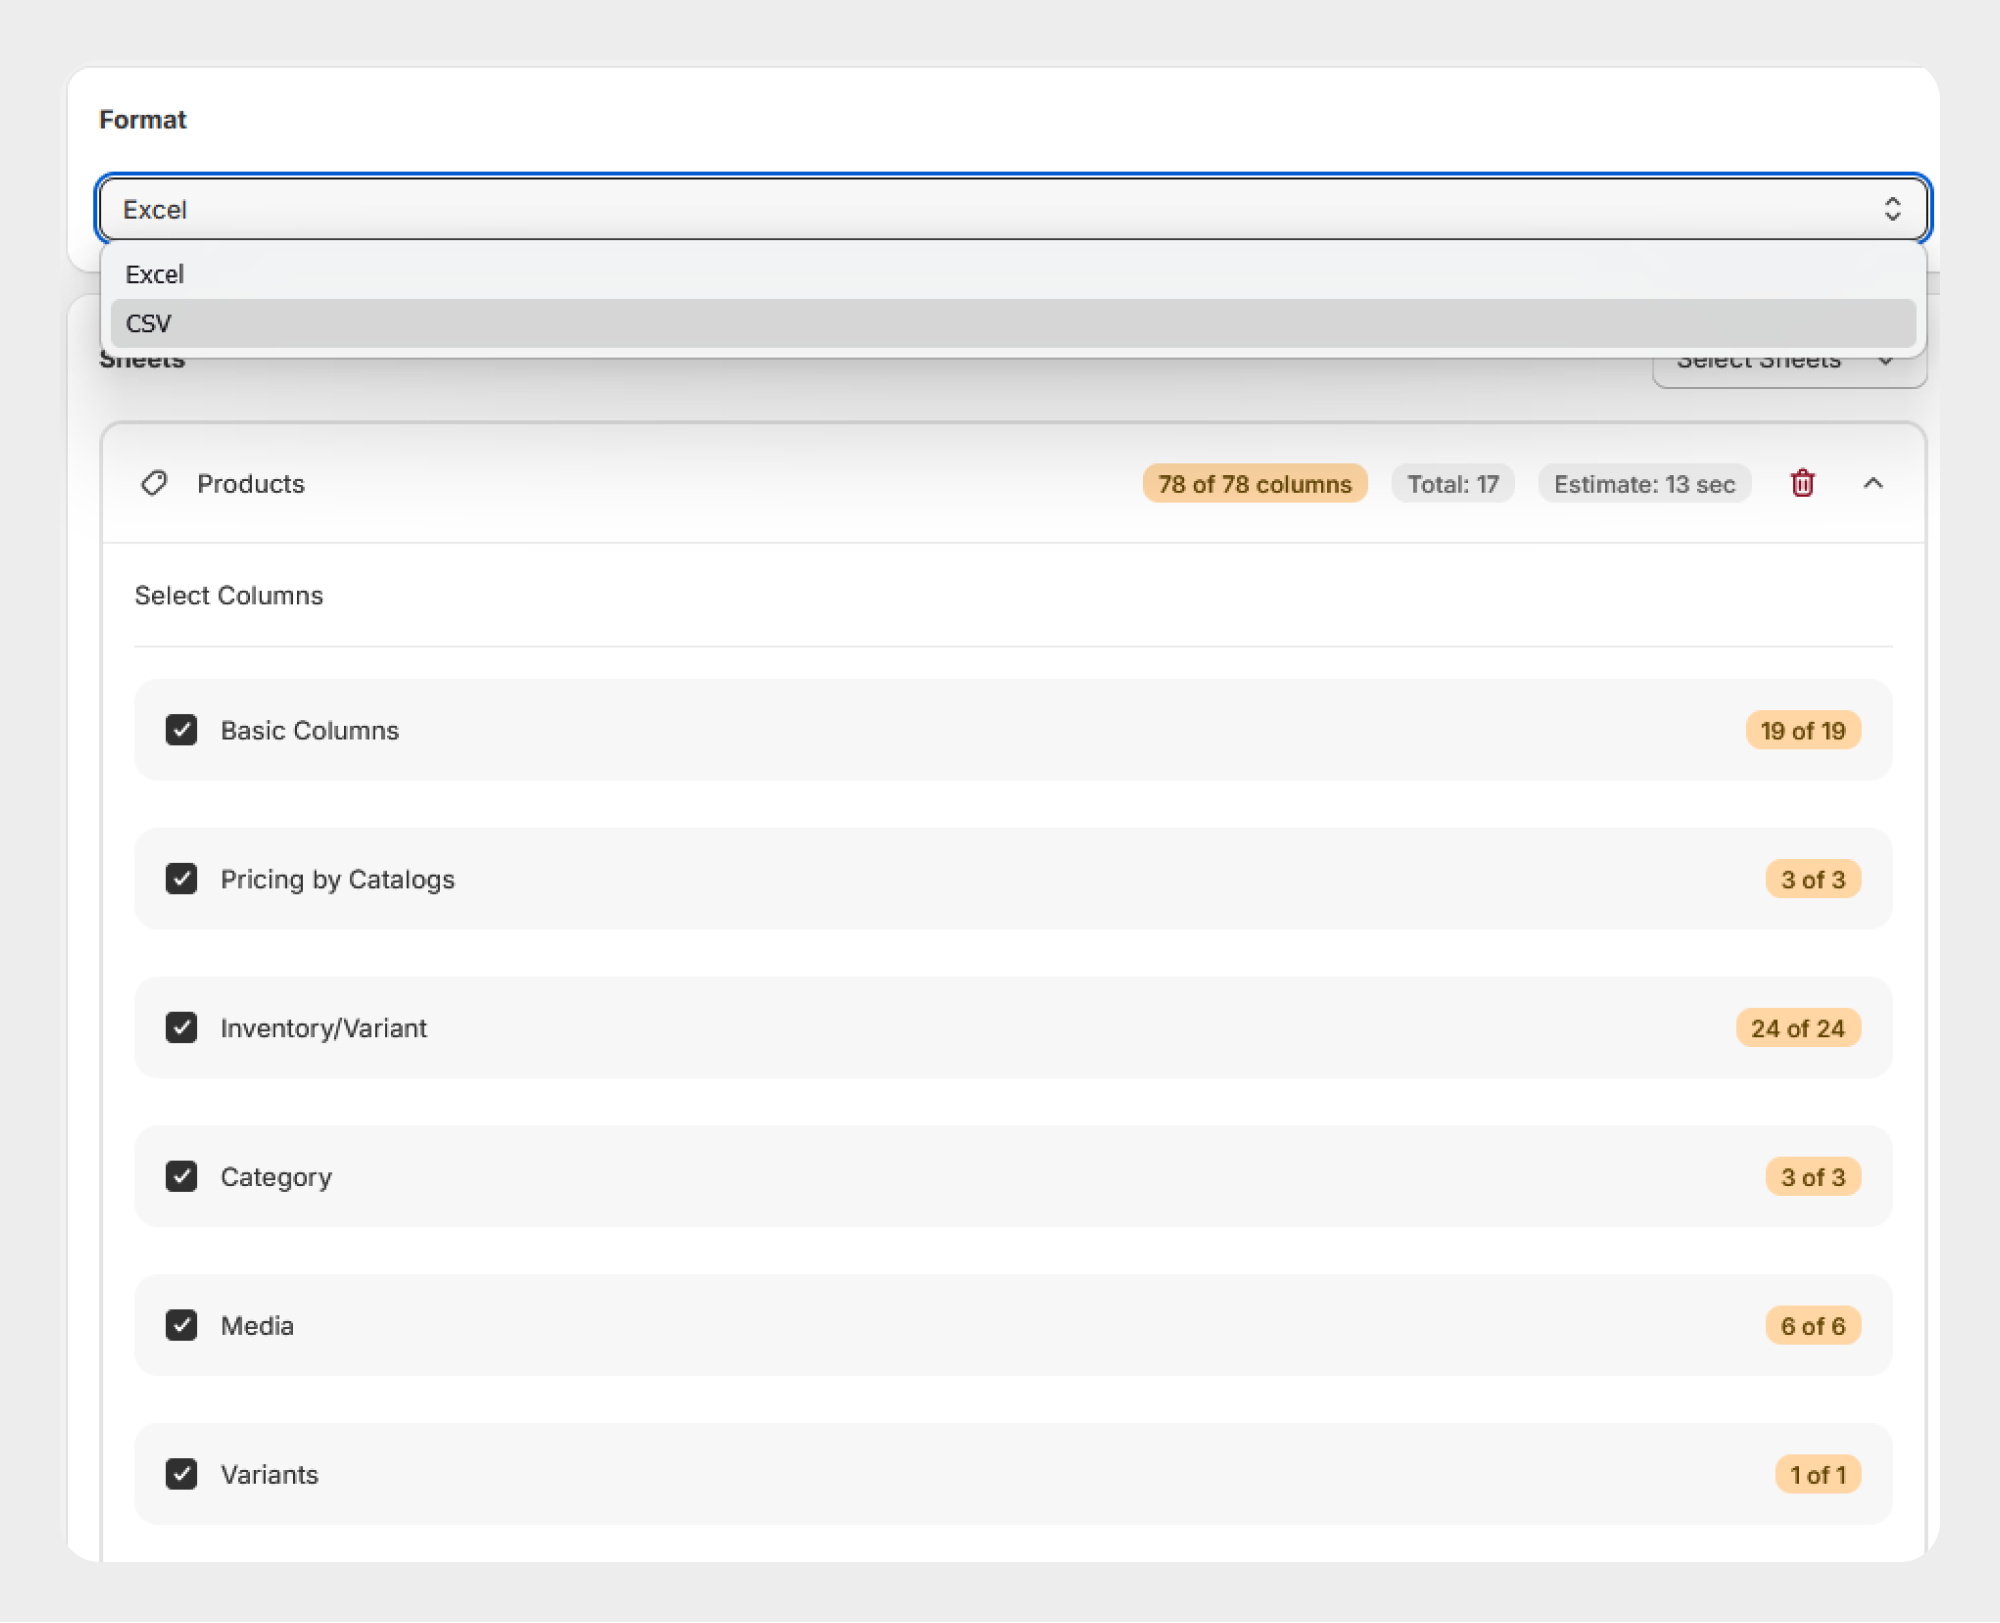
CSV is useful for data migration and system-based processing, while XLSX can be useful when you want to review or edit the exported product data using Microsoft Excel.
Step 5: Export Products
After configuring the export:
- Review the selected product fields.
- Review the applied filters.
- Select the required file format.
- Click Export.
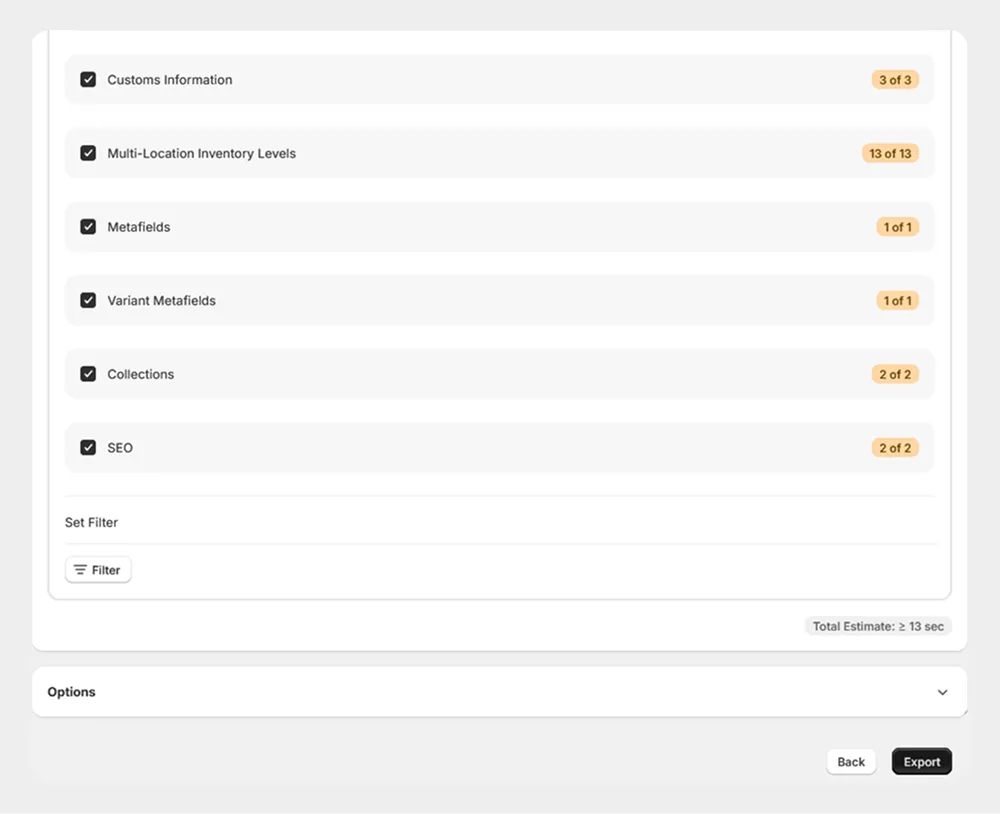
Migrato will start processing the product export.
You can monitor the progress of the export job from the application.
Step 6: Download the Exported File
Once the export is completed, the job status will be updated accordingly.
You can then download the generated CSV or XLSX file.
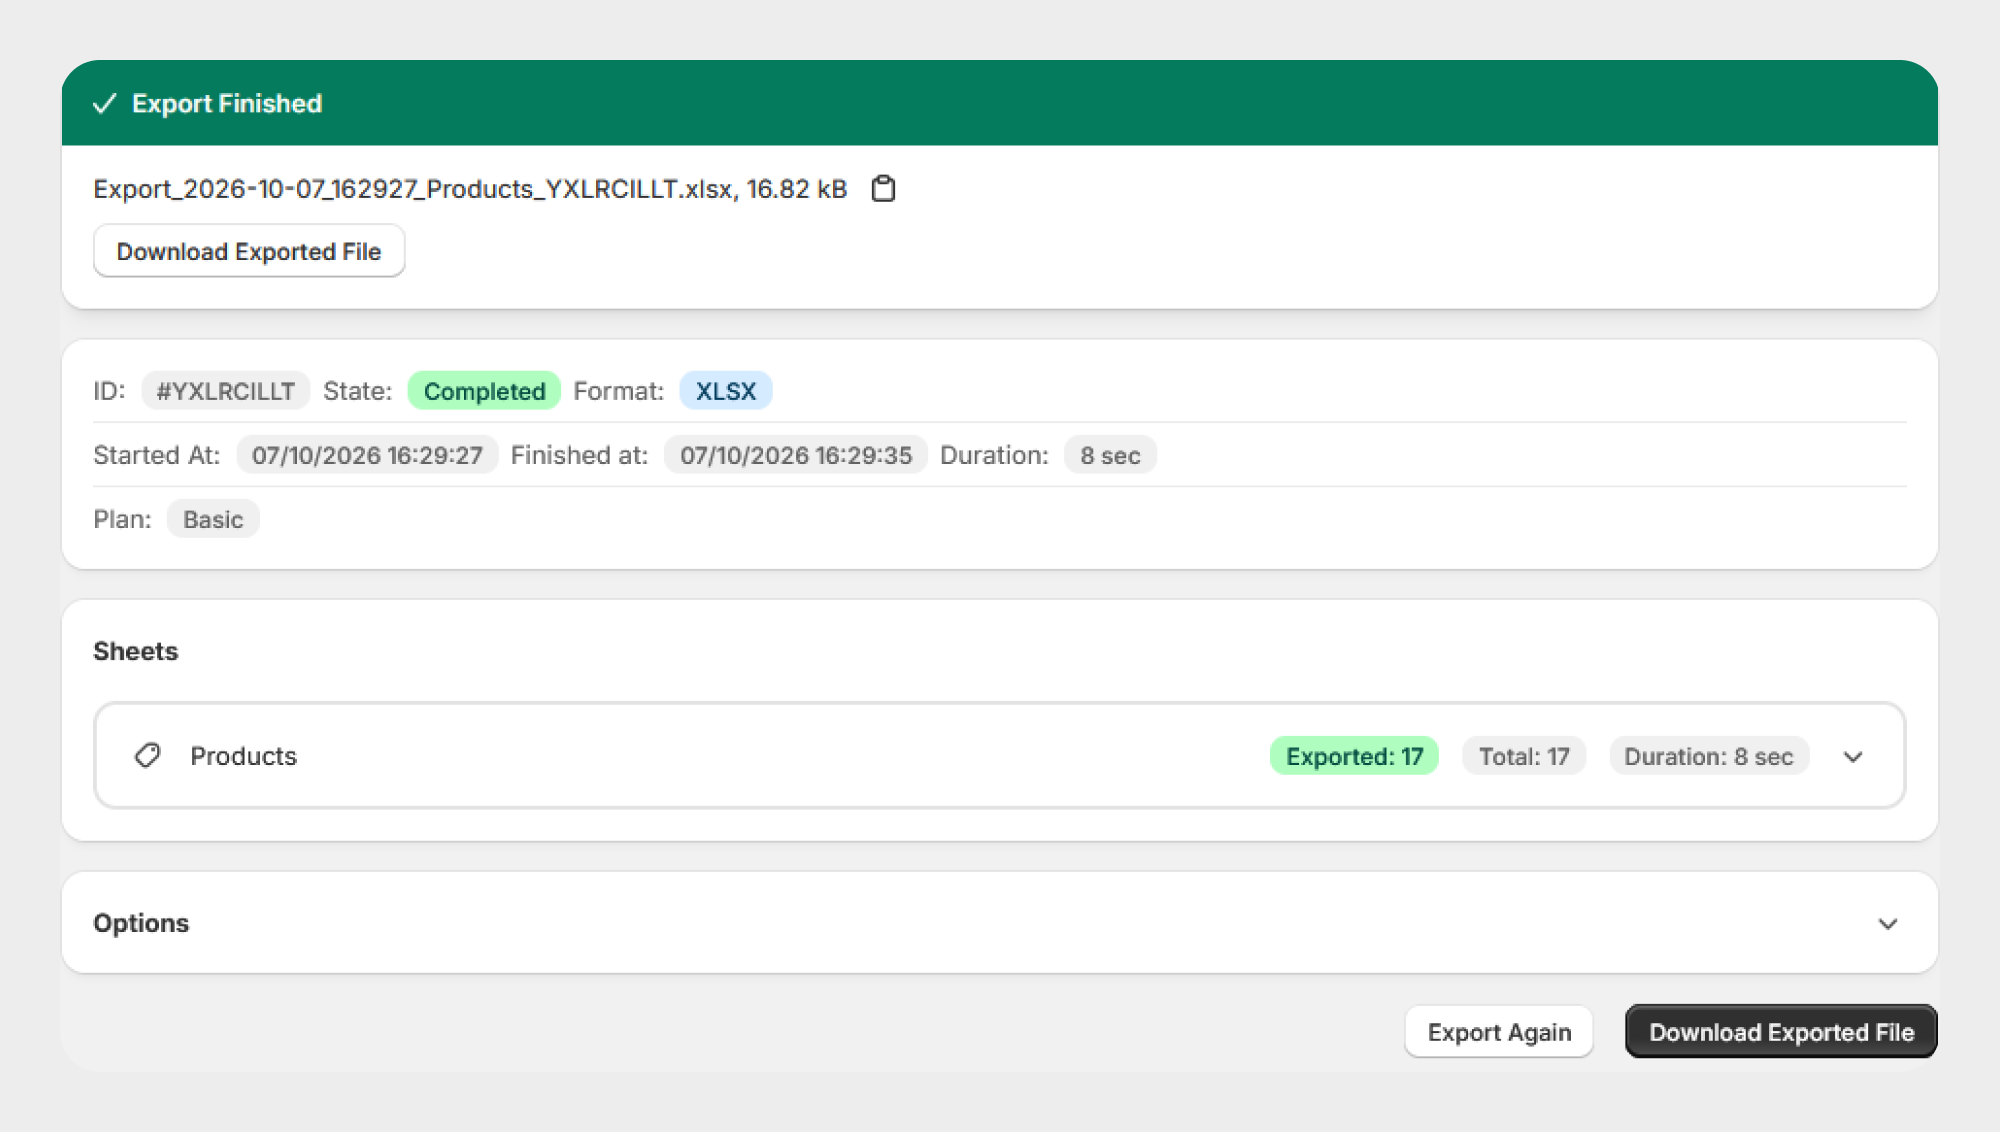
The exported file can be used for:
-
 Backup
-
Bulk editing
-
Reporting
-
Store migration
-
Updating products
-
Importing products into another Shopify store
Import Products
Migrato allows you to bulk import Shopify products using CSV or XLSX files. You can also import a product file directly from a publicly accessible URL.
Depending on your requirements, you can use Migrato to create new products, update existing products, merge existing and new products, replace existing products, or delete products in bulk.
The product import process also supports product-related data such as variants, inventory, images, collections, pricing, custom information, multi-location inventory, and metafields, based on the fields supported by the selected product template.
Before importing: We recommend downloading the Product Demo CSV/XLSX or reviewing the Product Template Documentation to understand the supported fields and required data structure.
Step 1: Upload or Provide the Product File
From your Shopify Admin:
- Go to Apps → Migrato.
- Open the Import section.
- Add your product file by clicking Add files, or drag and drop the file into the upload area.
- Migrato supports: CSV (.csv), Excel (.xlsx), Excel (.xls)
- Alternatively, you can provide the publicly accessible URL of a product file and upload the file directly from the URL.
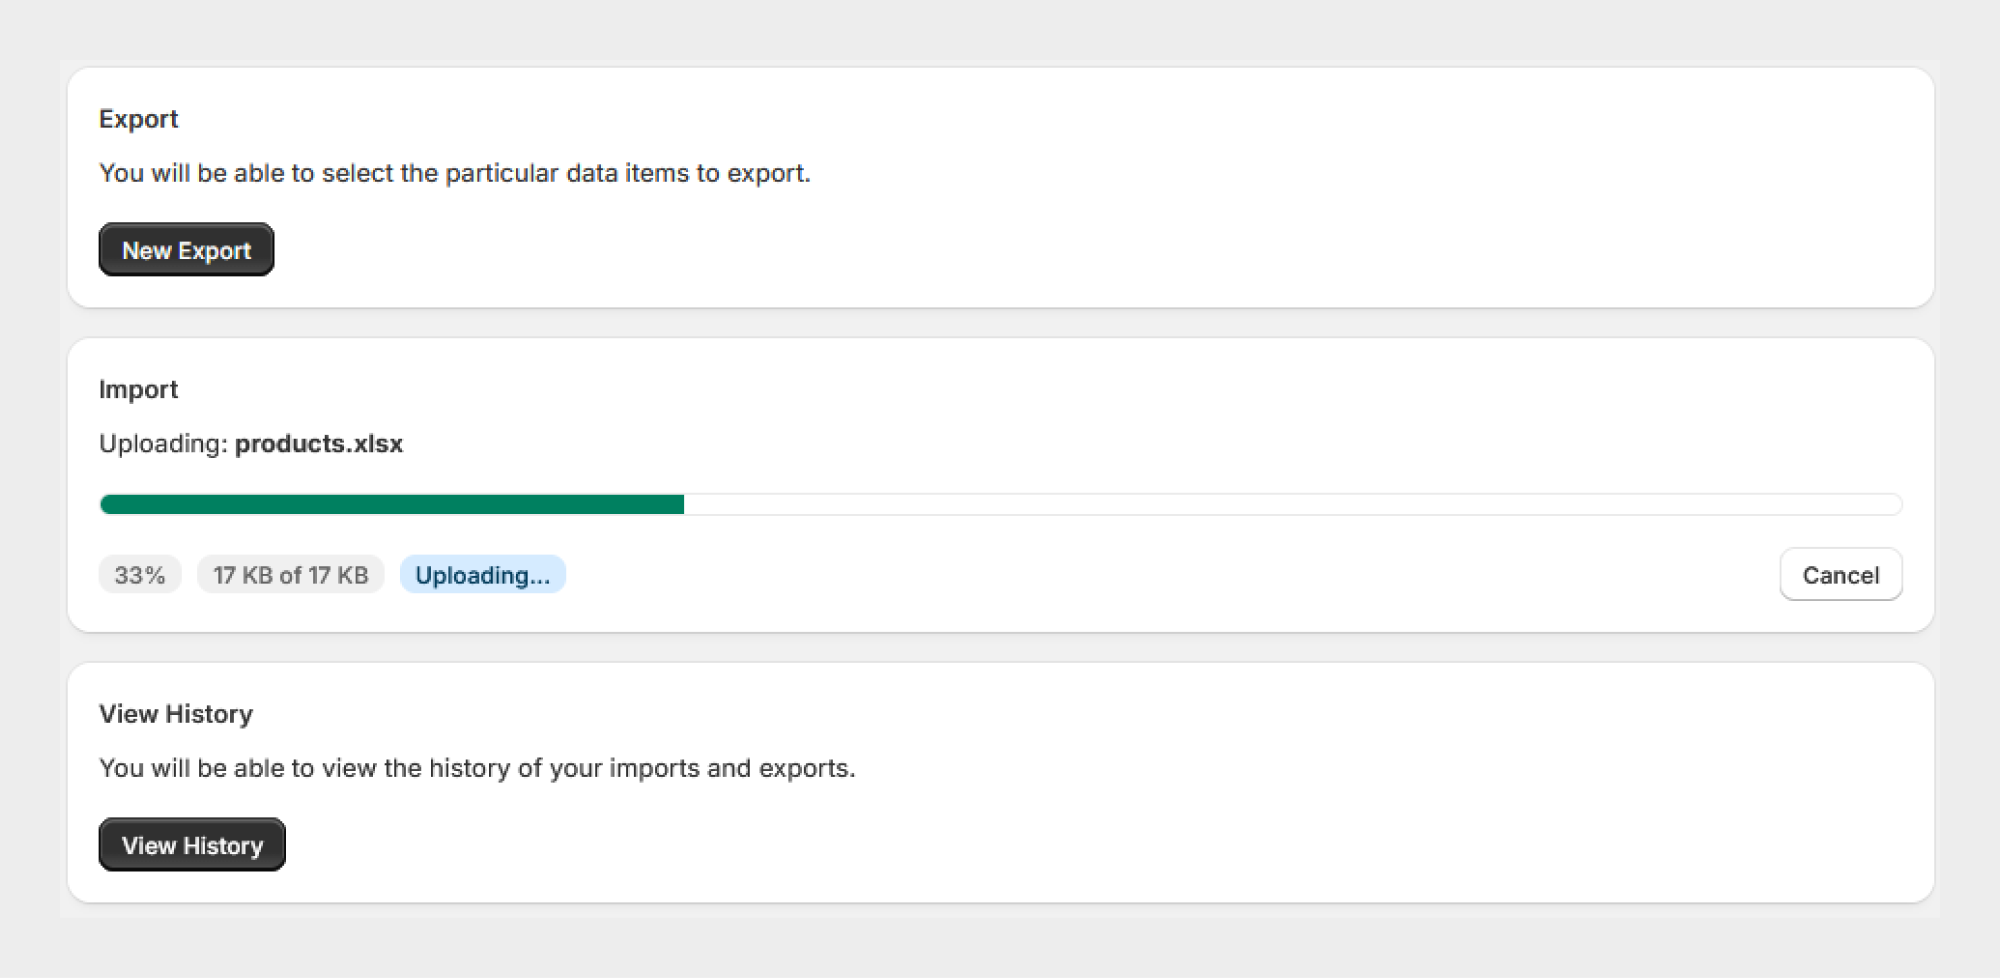
Import Using a File Upload
You can upload a product file directly from your computer by clicking Add files or dragging and dropping the file into the upload area.
For example:
-
products.csv -
products.xlsx -
products.xls
Import Using a File URL
If your product file is hosted on a third-party server, you can provide its publicly accessible URL instead of downloading the file to your computer.
For example:
https://example.com/products.csv
Select Server URL, enter the complete file URL, and click Upload from URL.
Note: The file URL must be publicly accessible to Migrato. Make sure the URL points directly to the file and that the file is available for download.
Step 2: Review the Imported File
After the file is uploaded or retrieved from the provided URL, Migrato creates an import job and displays the Import Details page.
The Import Details section provides information such as:
-
Import ID
-
Import State
-
File Format
-
Selected Operation
-
Uploaded File
-
File Size
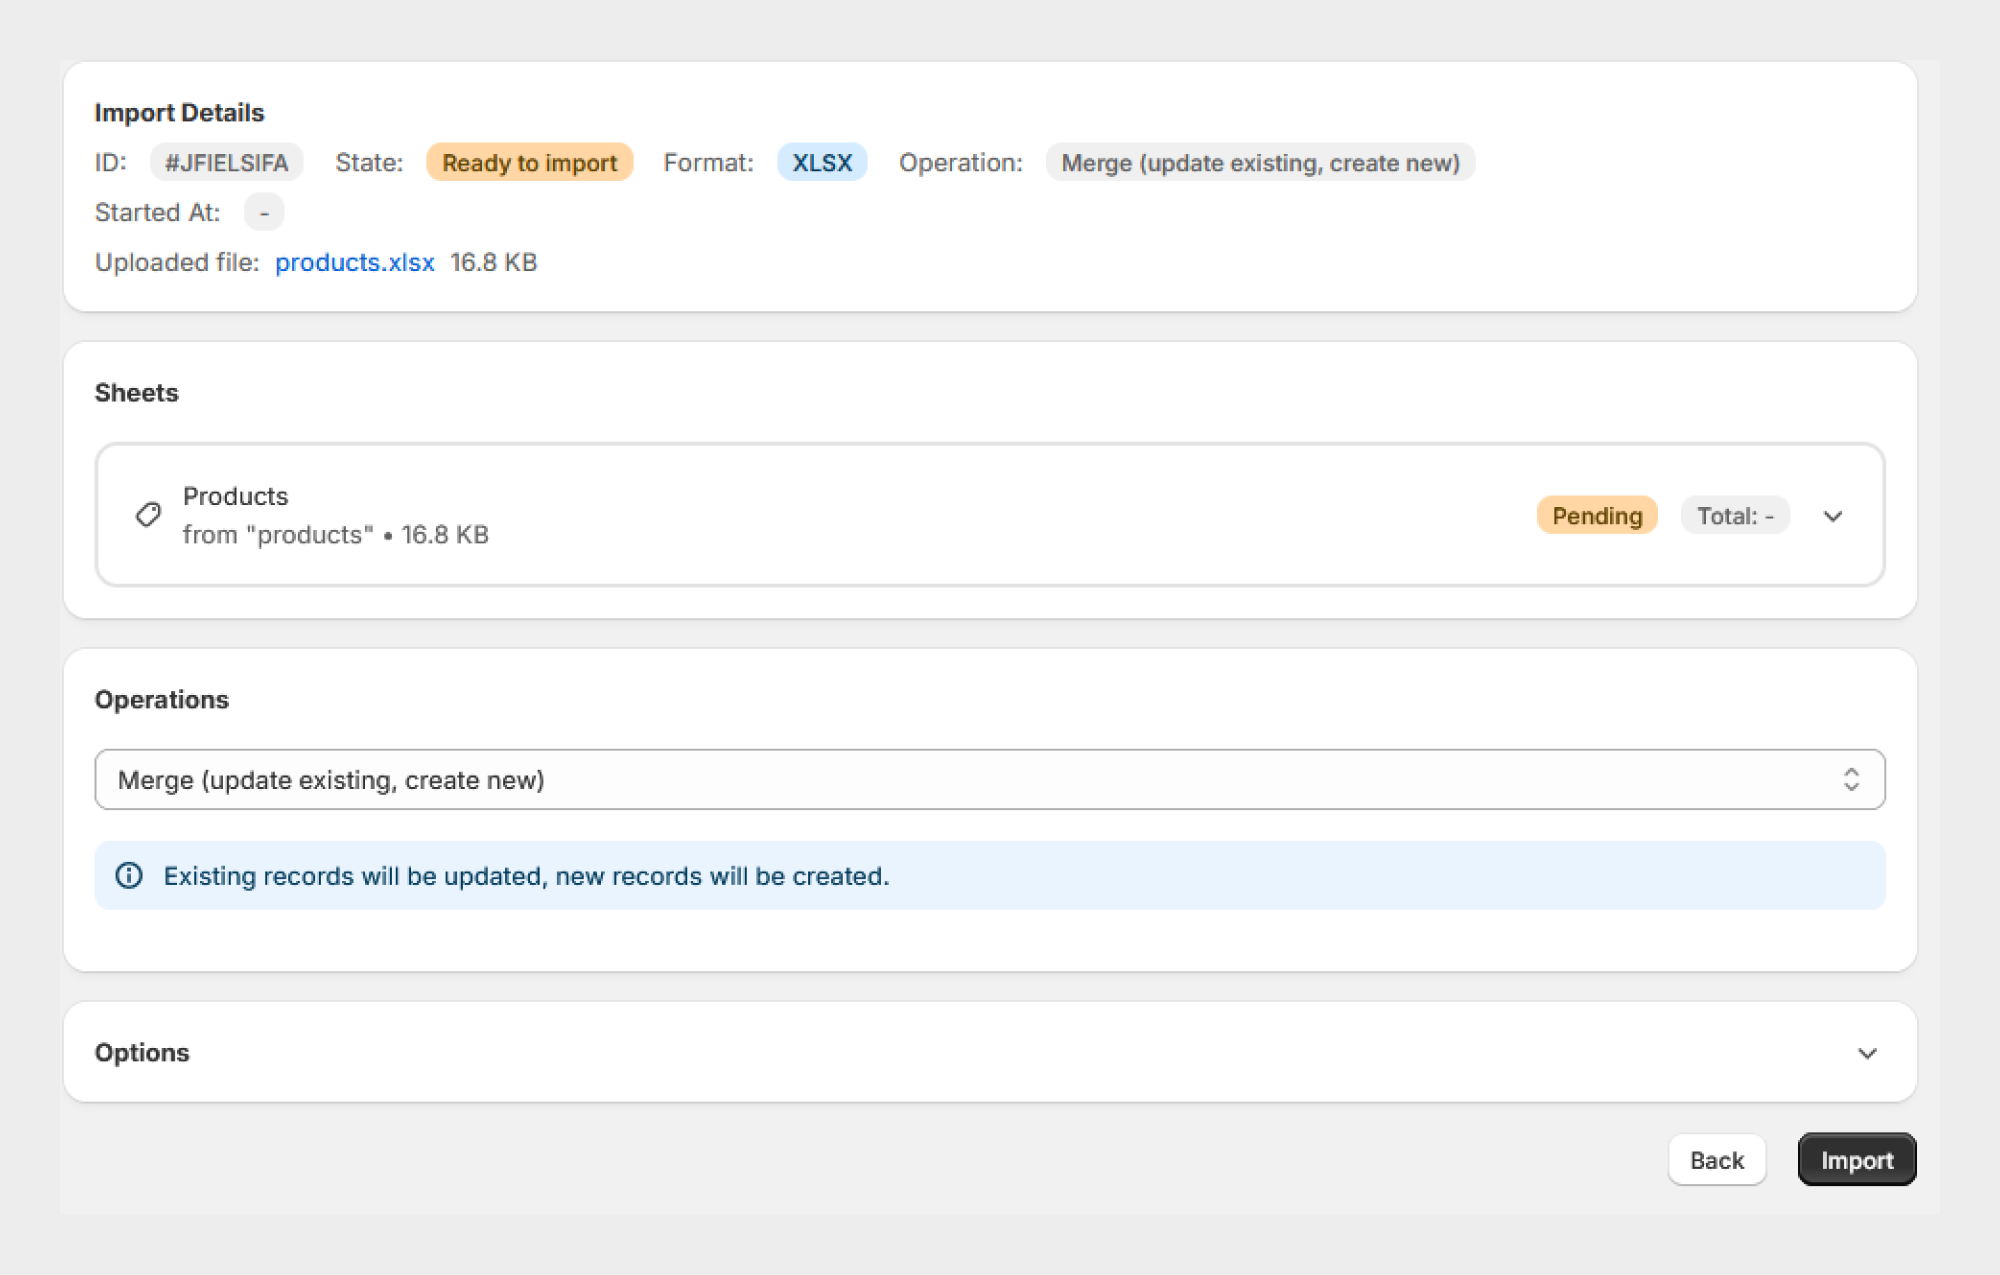
For example, the import page may display:
-
State: Ready to import
-
Format: CSV
-
Operation: Merge
-
Uploaded file:
products.csv
The uploaded file is also displayed under the Sheets section.
Step 3: Review the Product Sheet
Under Sheets, Migrato displays the entity detected from the uploaded file.
For a product import, the sheet is displayed as Products.
The sheet section provides information about the imported data and its current processing status.
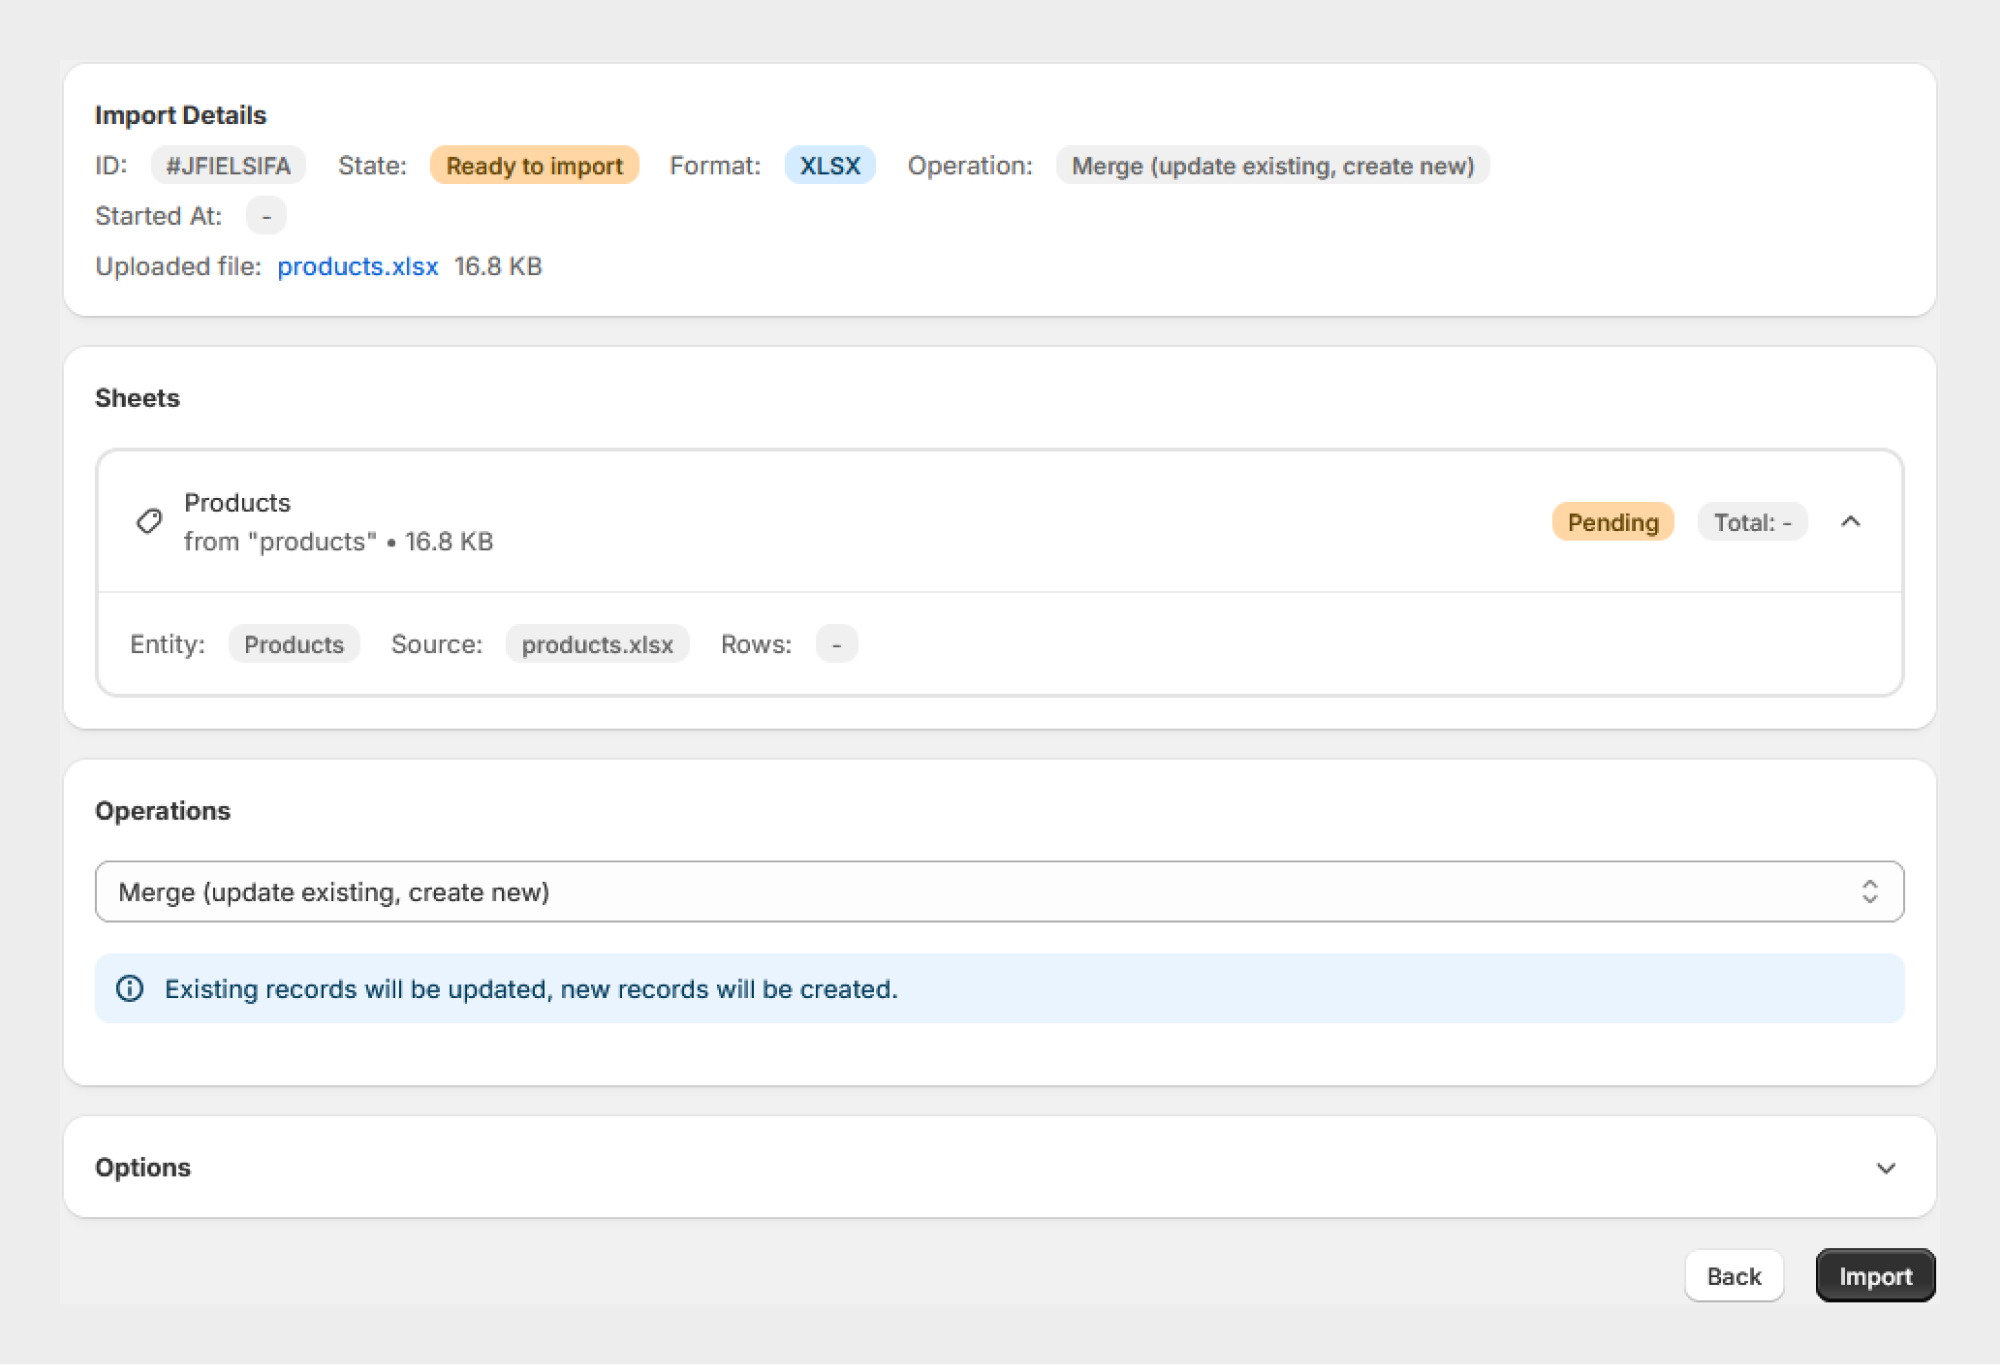
The sheet may display information such as:
-
Entity name
-
Source file name
-
Processing status
-
Total records
Note: Migrato identifies the entity type from the uploaded file and prepares the corresponding import workflow.
Step 4: Select the Import Operation
Migrato allows you to select how the product data should be applied to your Shopify store.
Under Operations, select the appropriate operation from the available options.
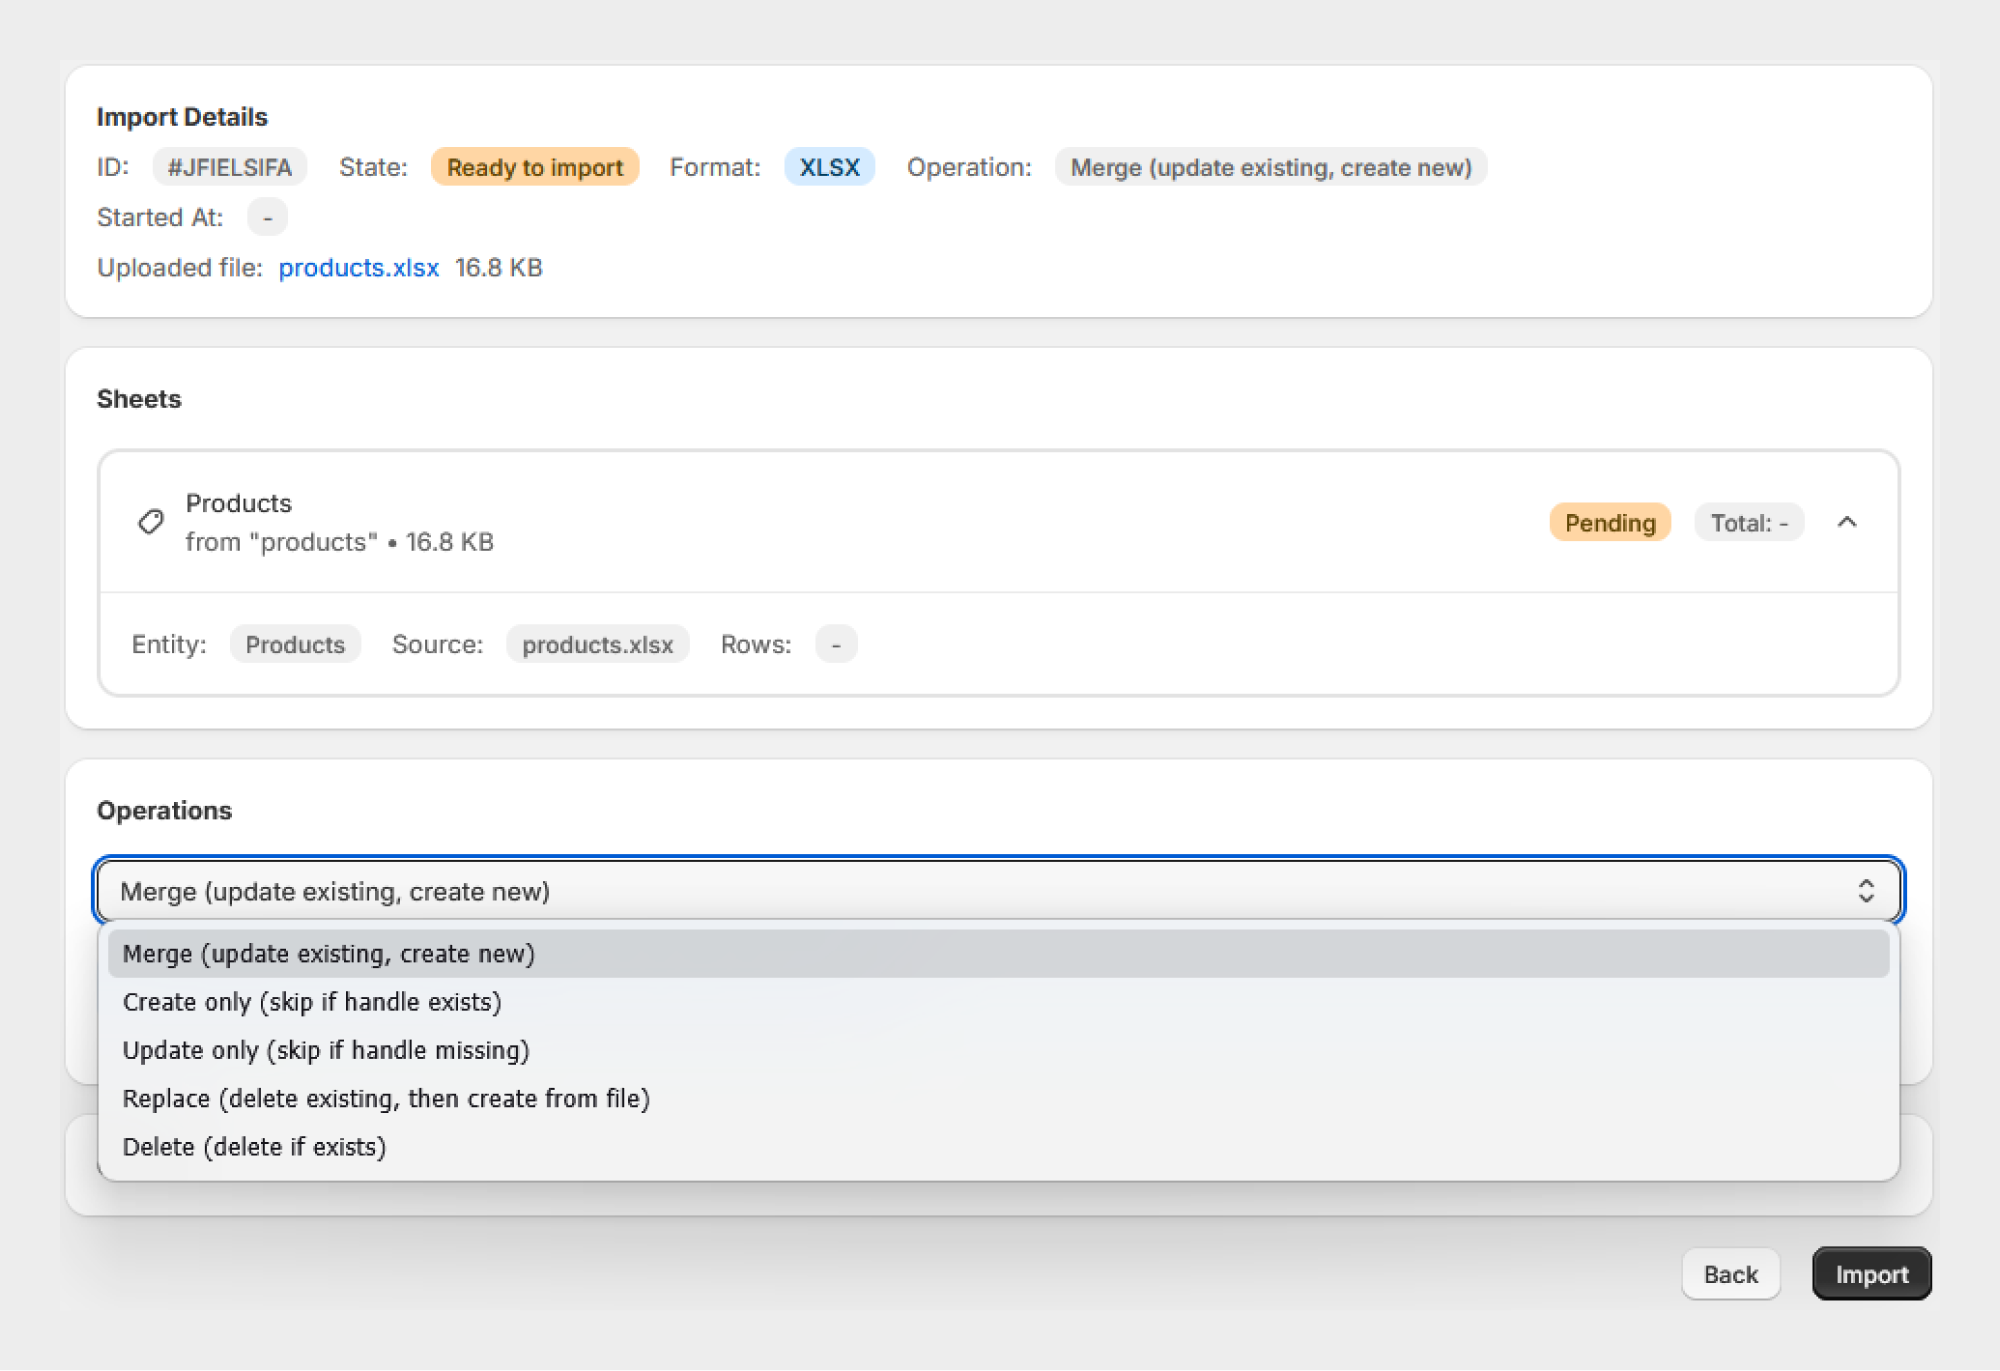
The available operations are:
Merge – Update Existing, Create New
The Merge operation updates existing products and creates new products that do not already exist.
Use this option when you want to synchronize your product file with your Shopify store.
For example:
-
Existing product → Updated
-
New product → Created
Recommended: Merge is useful for regular product updates where the same file may contain both existing and new products.
Create Only – Skip if Handle Exists
The Create only operation creates new products and skips products whose handle already exists in the Shopify store.
Use this option when you only want to add new products without modifying existing products.
For example:
-
Existing product → Skipped
-
New product → Created
Update Only – Skip if Handle Missing
The Update only operation updates existing products and skips products that cannot be matched to an existing Shopify product.
Use this option when you want to update an existing catalog without creating new products.
For example:
-
Existing product → Updated
-
Product not found → Skipped
Replace – Delete Existing, Then Create from File
The Replace operation deletes the existing product and then creates the product again using the information provided in the import file.
Use this operation carefully, particularly when working with a live store.
For example:
-
Existing product → Deleted
-
Product from import file → Created
Warning: Replace can modify or remove existing product data. We recommend testing the operation with a small dataset before processing a large product catalog.
Delete – Delete if Exists
The Delete operation deletes products that exist in your Shopify store and match the records in the import file.
Use this operation when you need to remove products in bulk.
For example:
-
Existing product → Deleted
-
Product not found → No product is deleted
Warning: Deleting products can be destructive. Always verify your import file and selected operation before starting the job.
Step 5: Configure Import Options
After selecting the required operation, expand the Options section to configure additional settings for the import job.
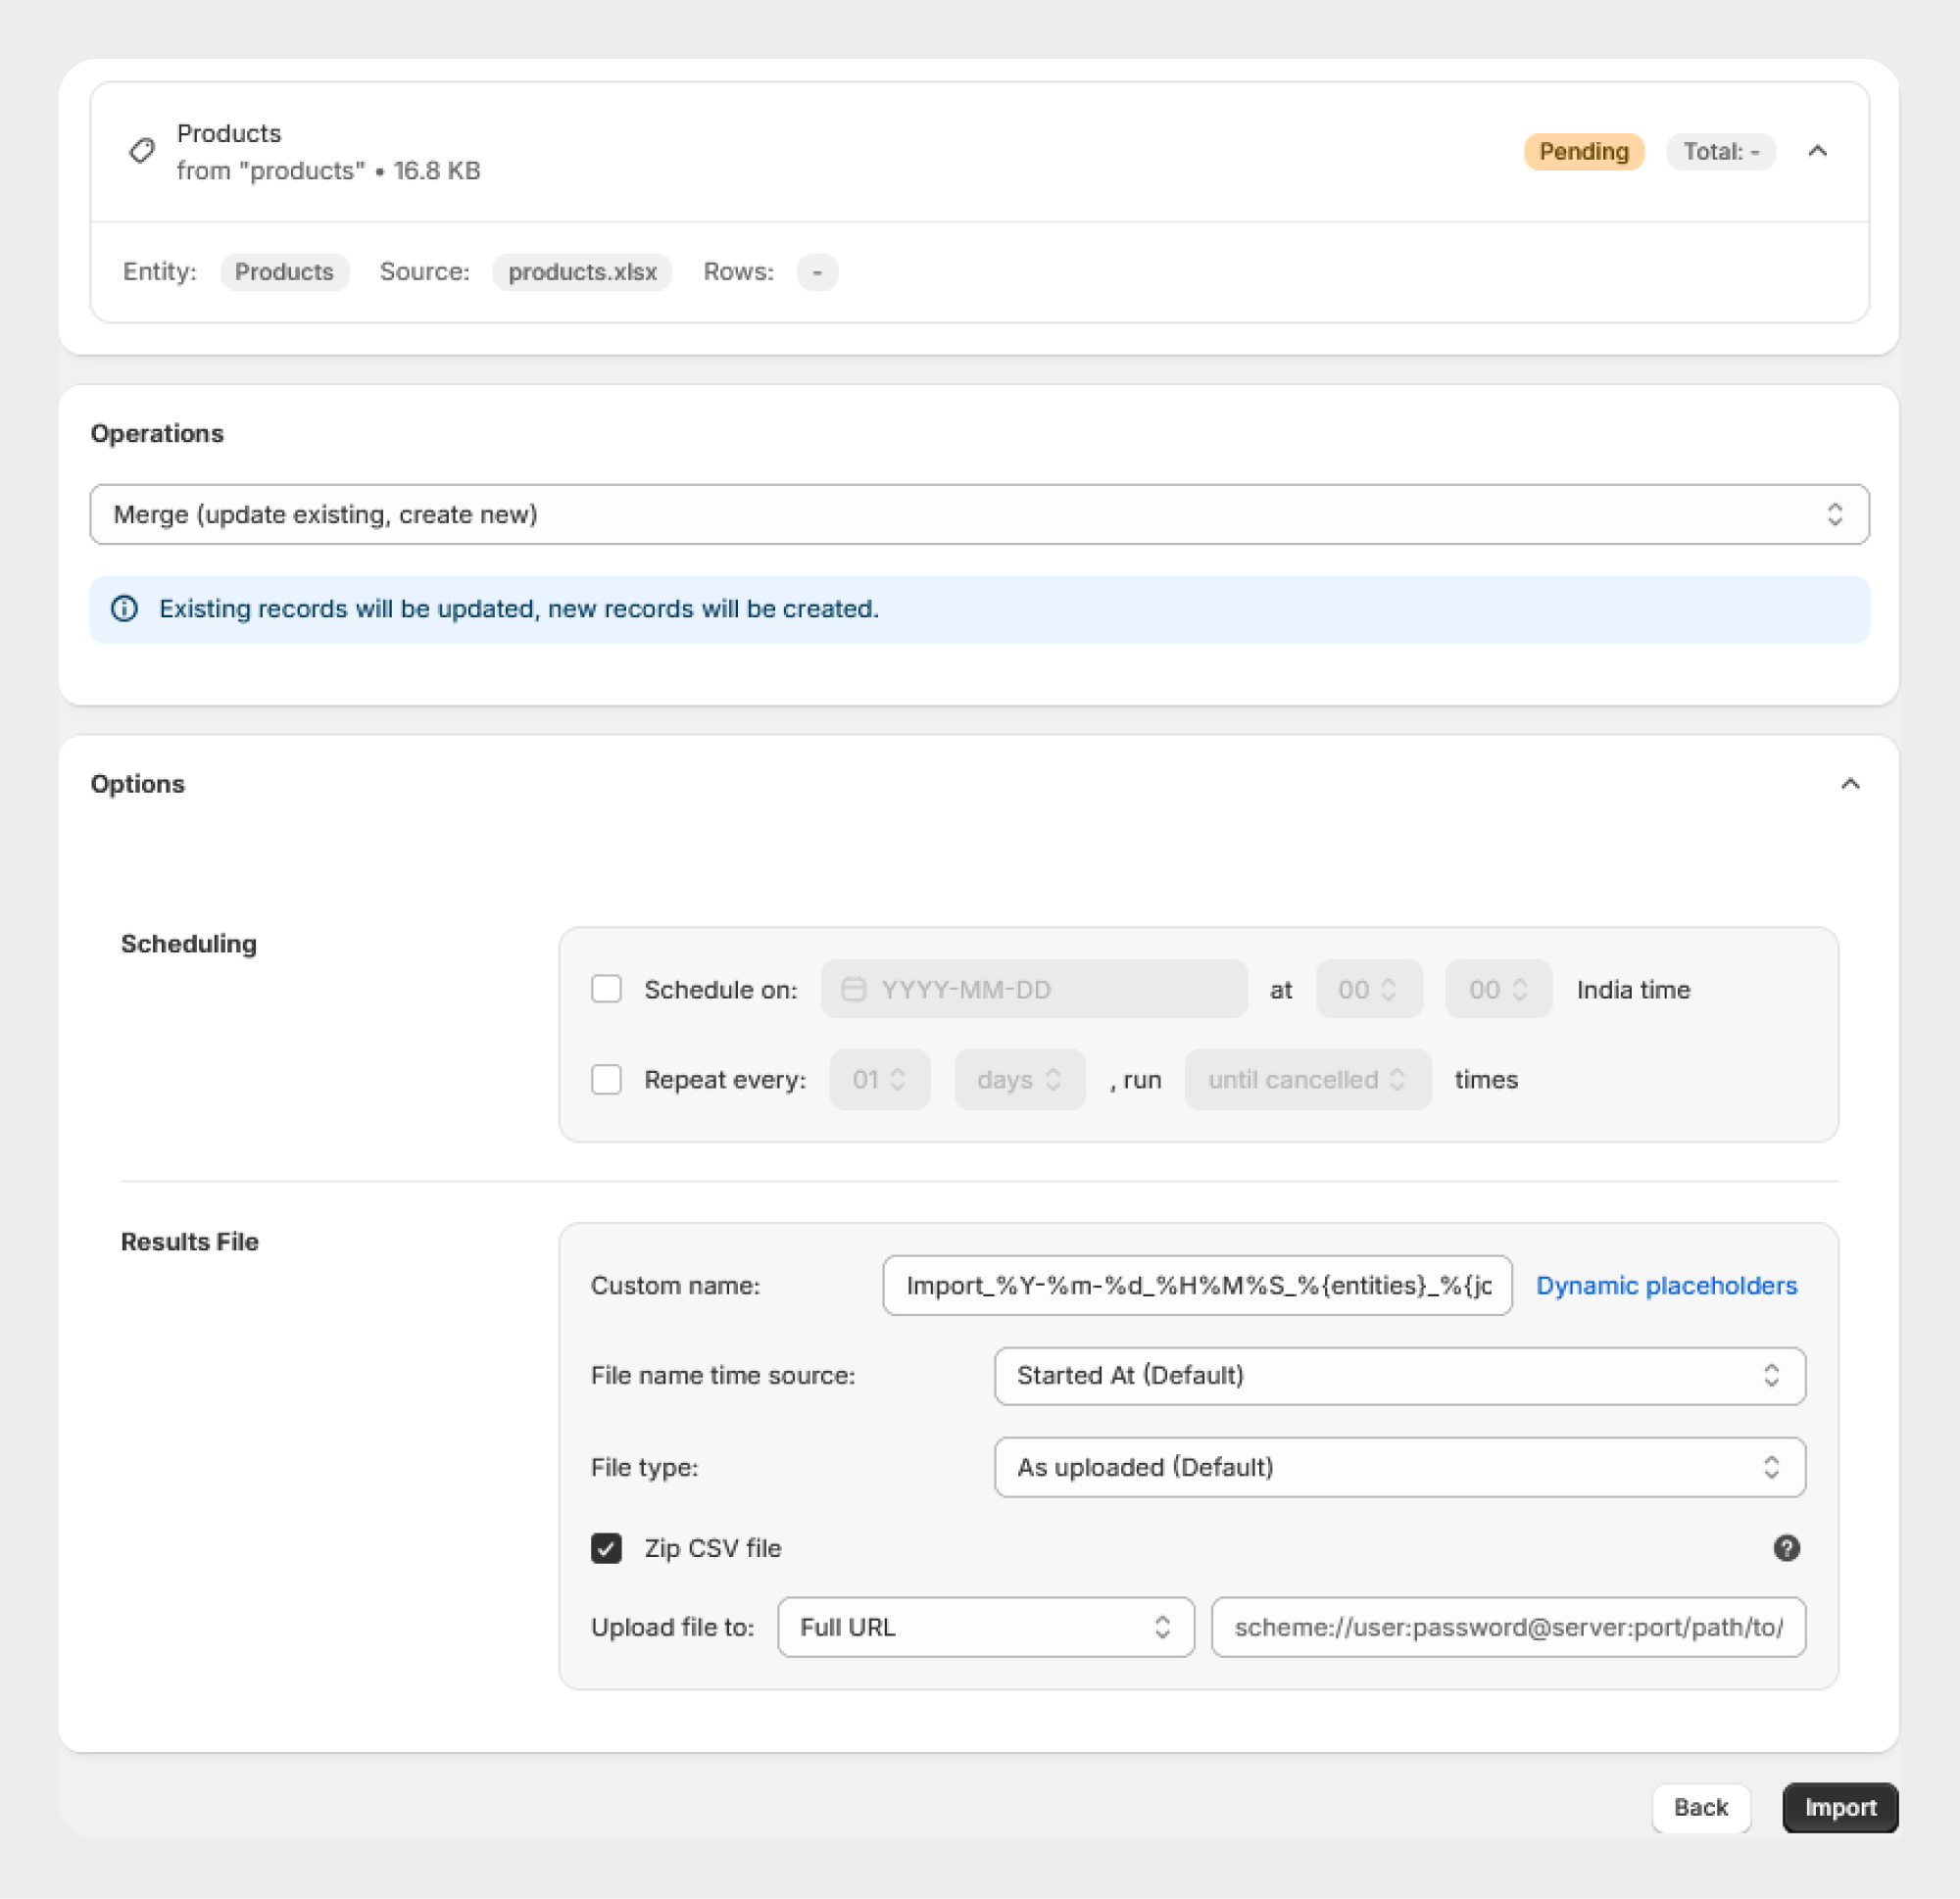
Depending on the available configuration, the Options section can include settings for:
-
Scheduling
-
Results File
Scheduling
Migrato allows you to schedule an import instead of running it immediately.
You can configure:
-
Schedule on – Select the date and time when the import should start.
-
Repeat every – Configure the interval at which the import should repeat.
-
Run until – Specify how long or how many times the scheduled job should run.
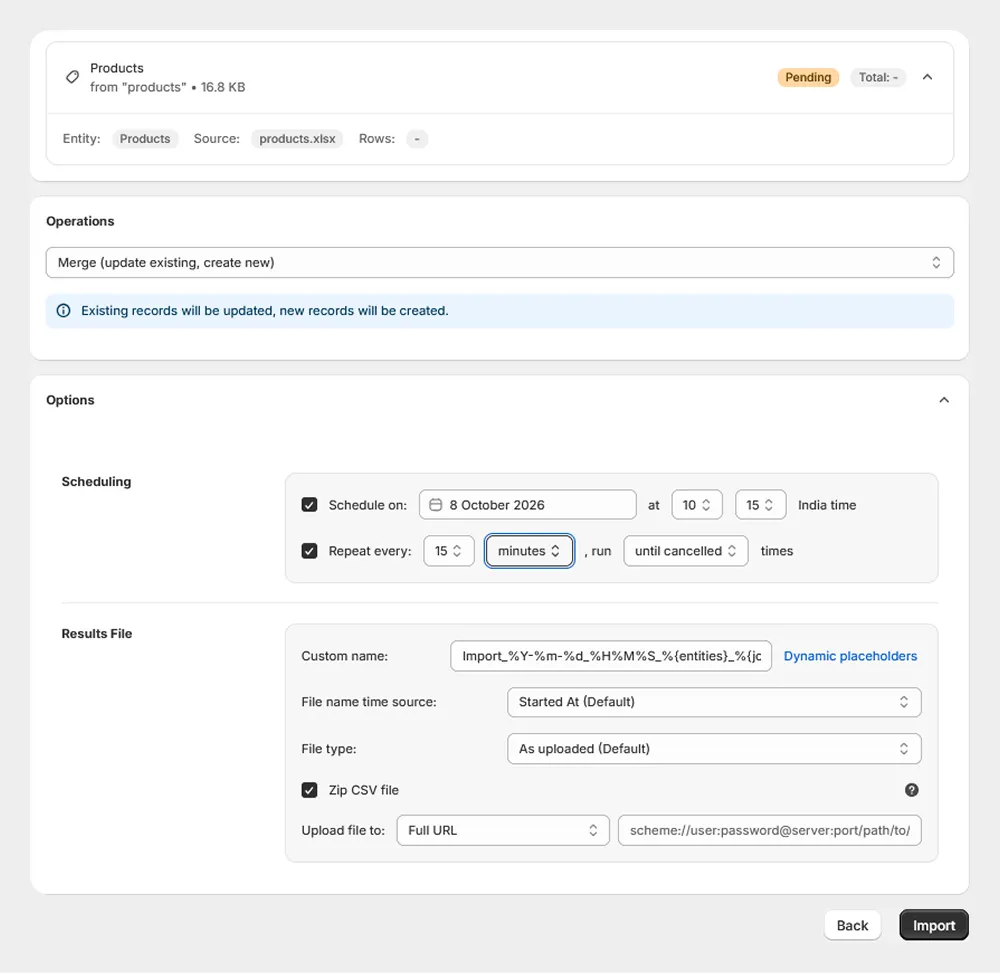
Scheduled imports are useful when product data needs to be updated regularly from an external source.
For example, you can use scheduled imports for:
-
Supplier product feeds
-
Regular catalog updates
-
Inventory updates
-
Recurring product data synchronization
Note: Scheduling options may depend on your Migrato plan and the available app configuration.
Results File
Migrato can generate a results file after processing the import.
The Results File section allows you to configure how the result file should be generated and stored.
Depending on the available options, you can configure:
-
Custom file name
-
File name time source
-
File type
-
ZIP CSV file
-
Upload destination
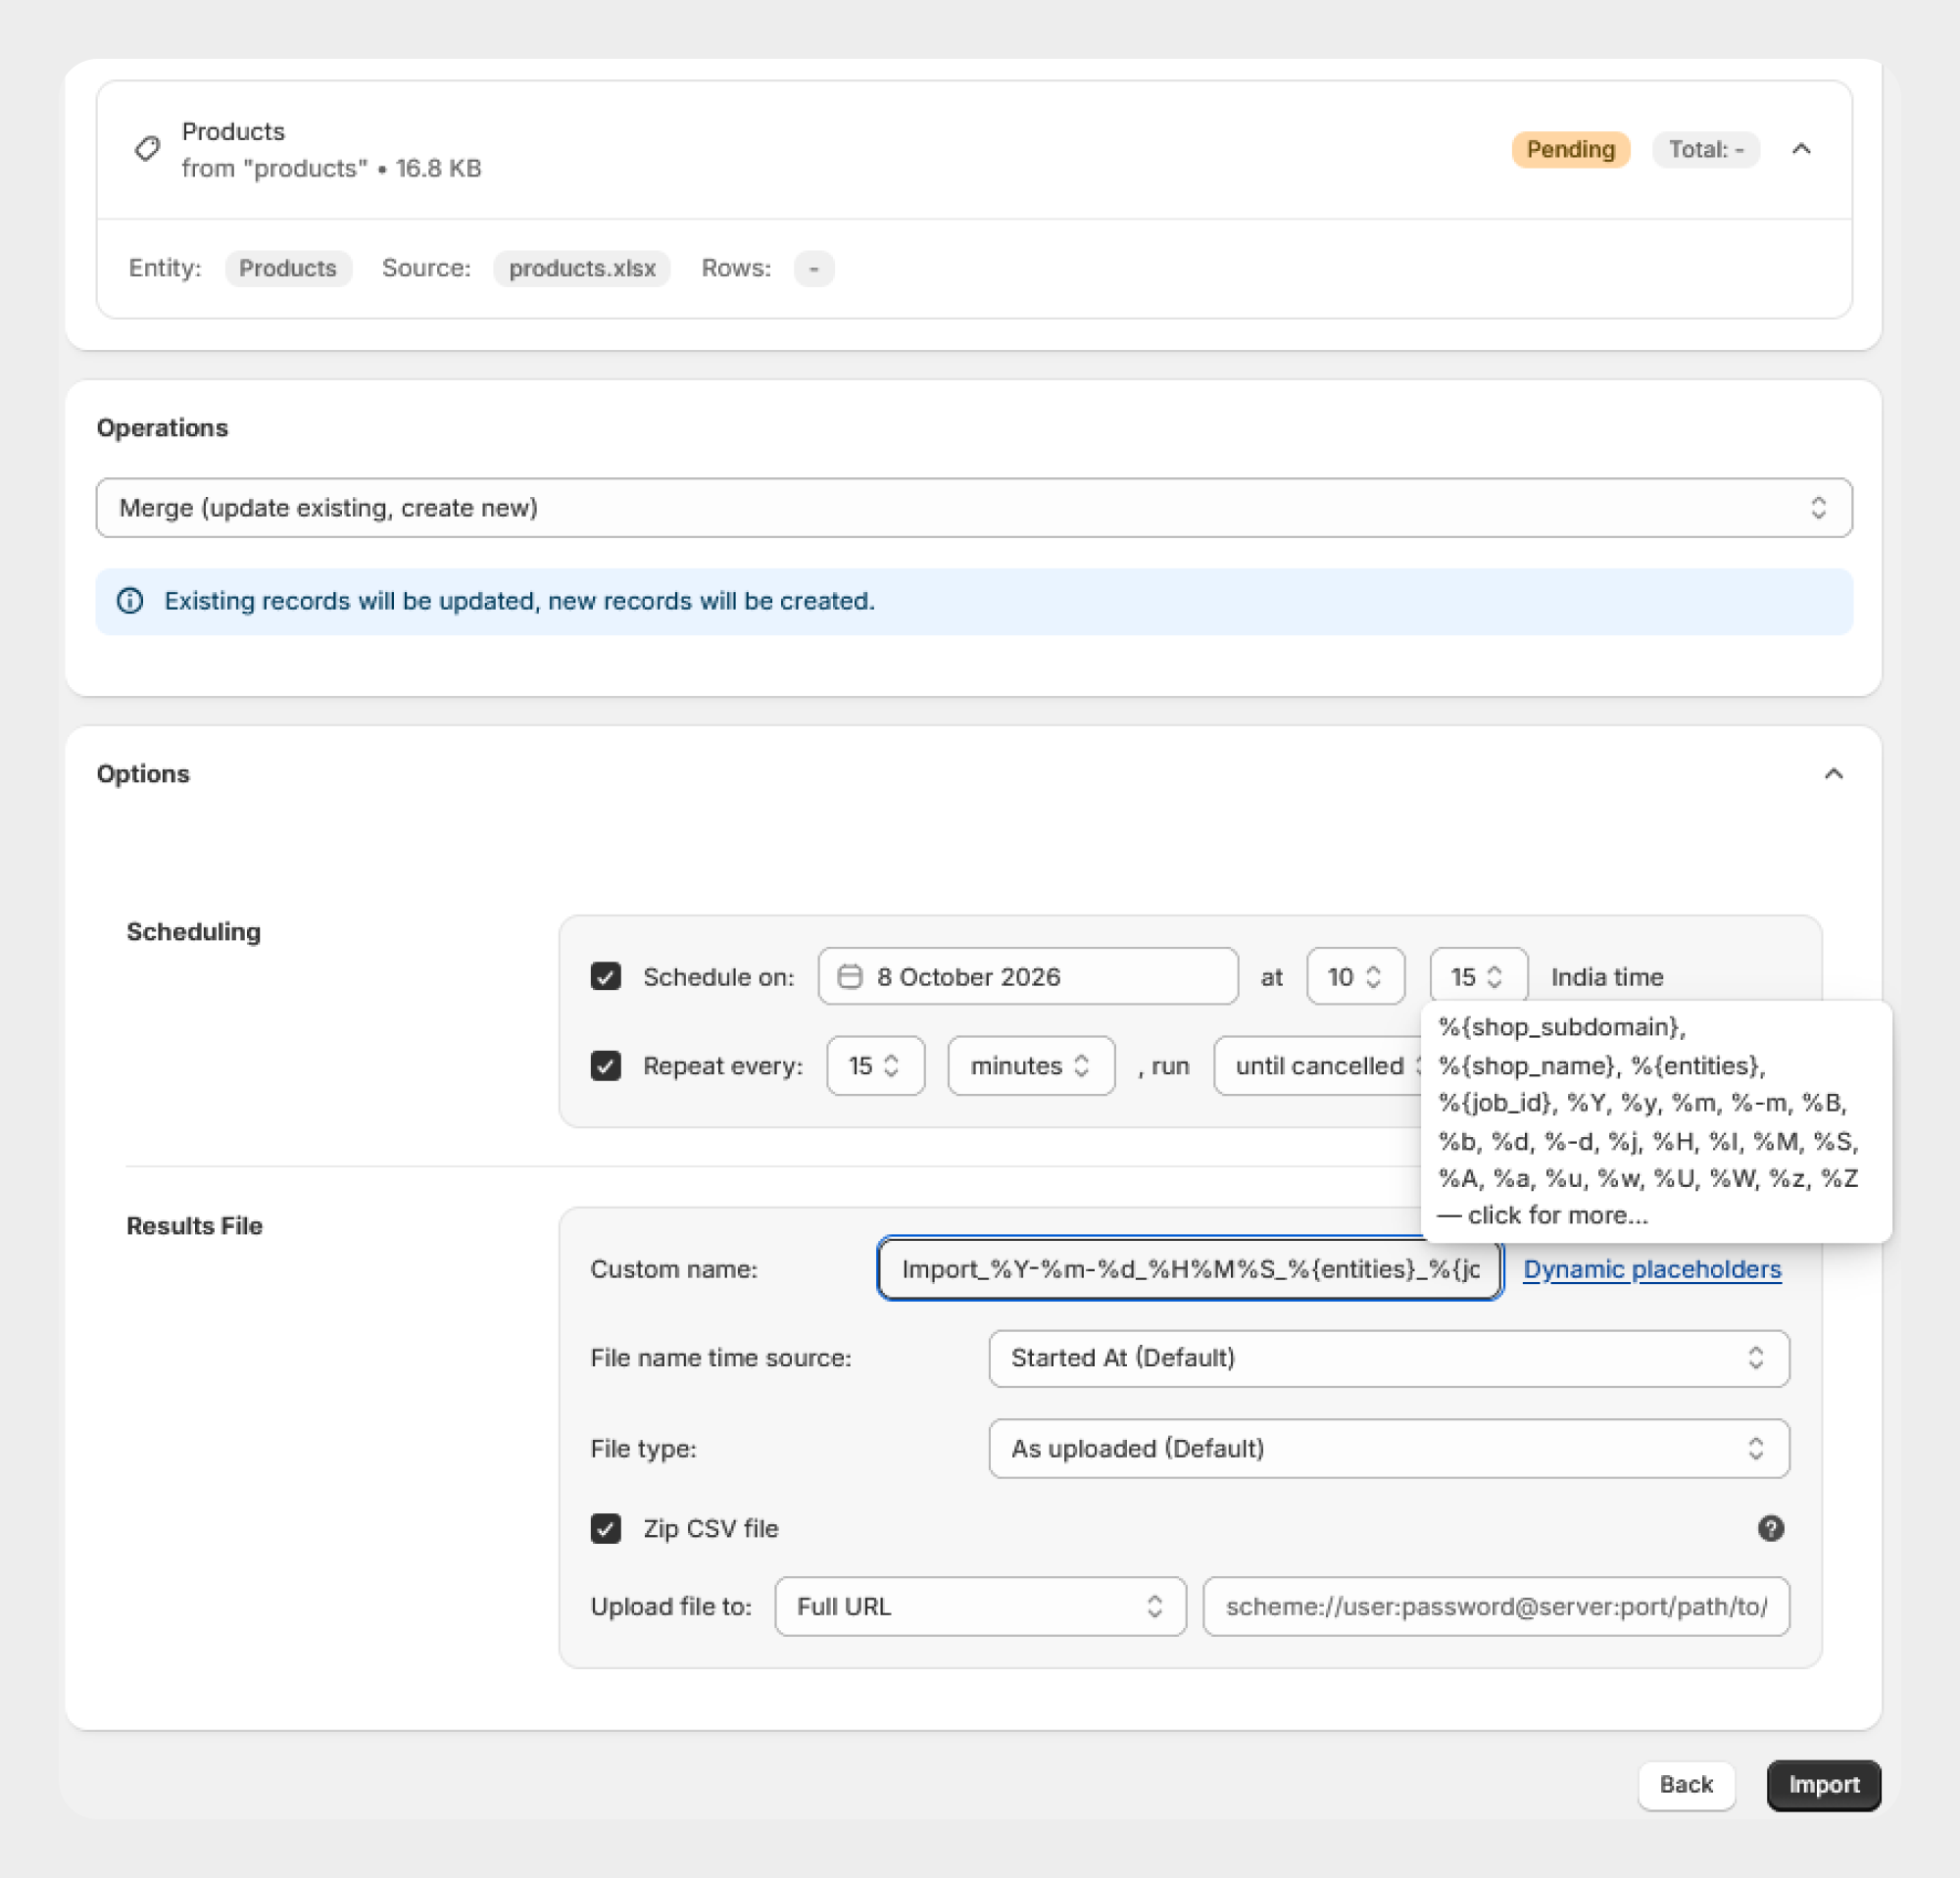
You can also use Dynamic placeholders when creating a custom results-file name.
This can help you identify the results of individual import jobs, particularly when imports are scheduled or repeated.
Step 6: Start the Product Import
After reviewing the file and selecting the required operation:
- Review the Import Details.
- Verify the uploaded product file.
- Review the Products sheet.
- Confirm the selected Operation.
- Review the Options.
- If required, configure the import schedule.
- Click Import.
The Import button is available at the top-right and bottom-right of the import page.
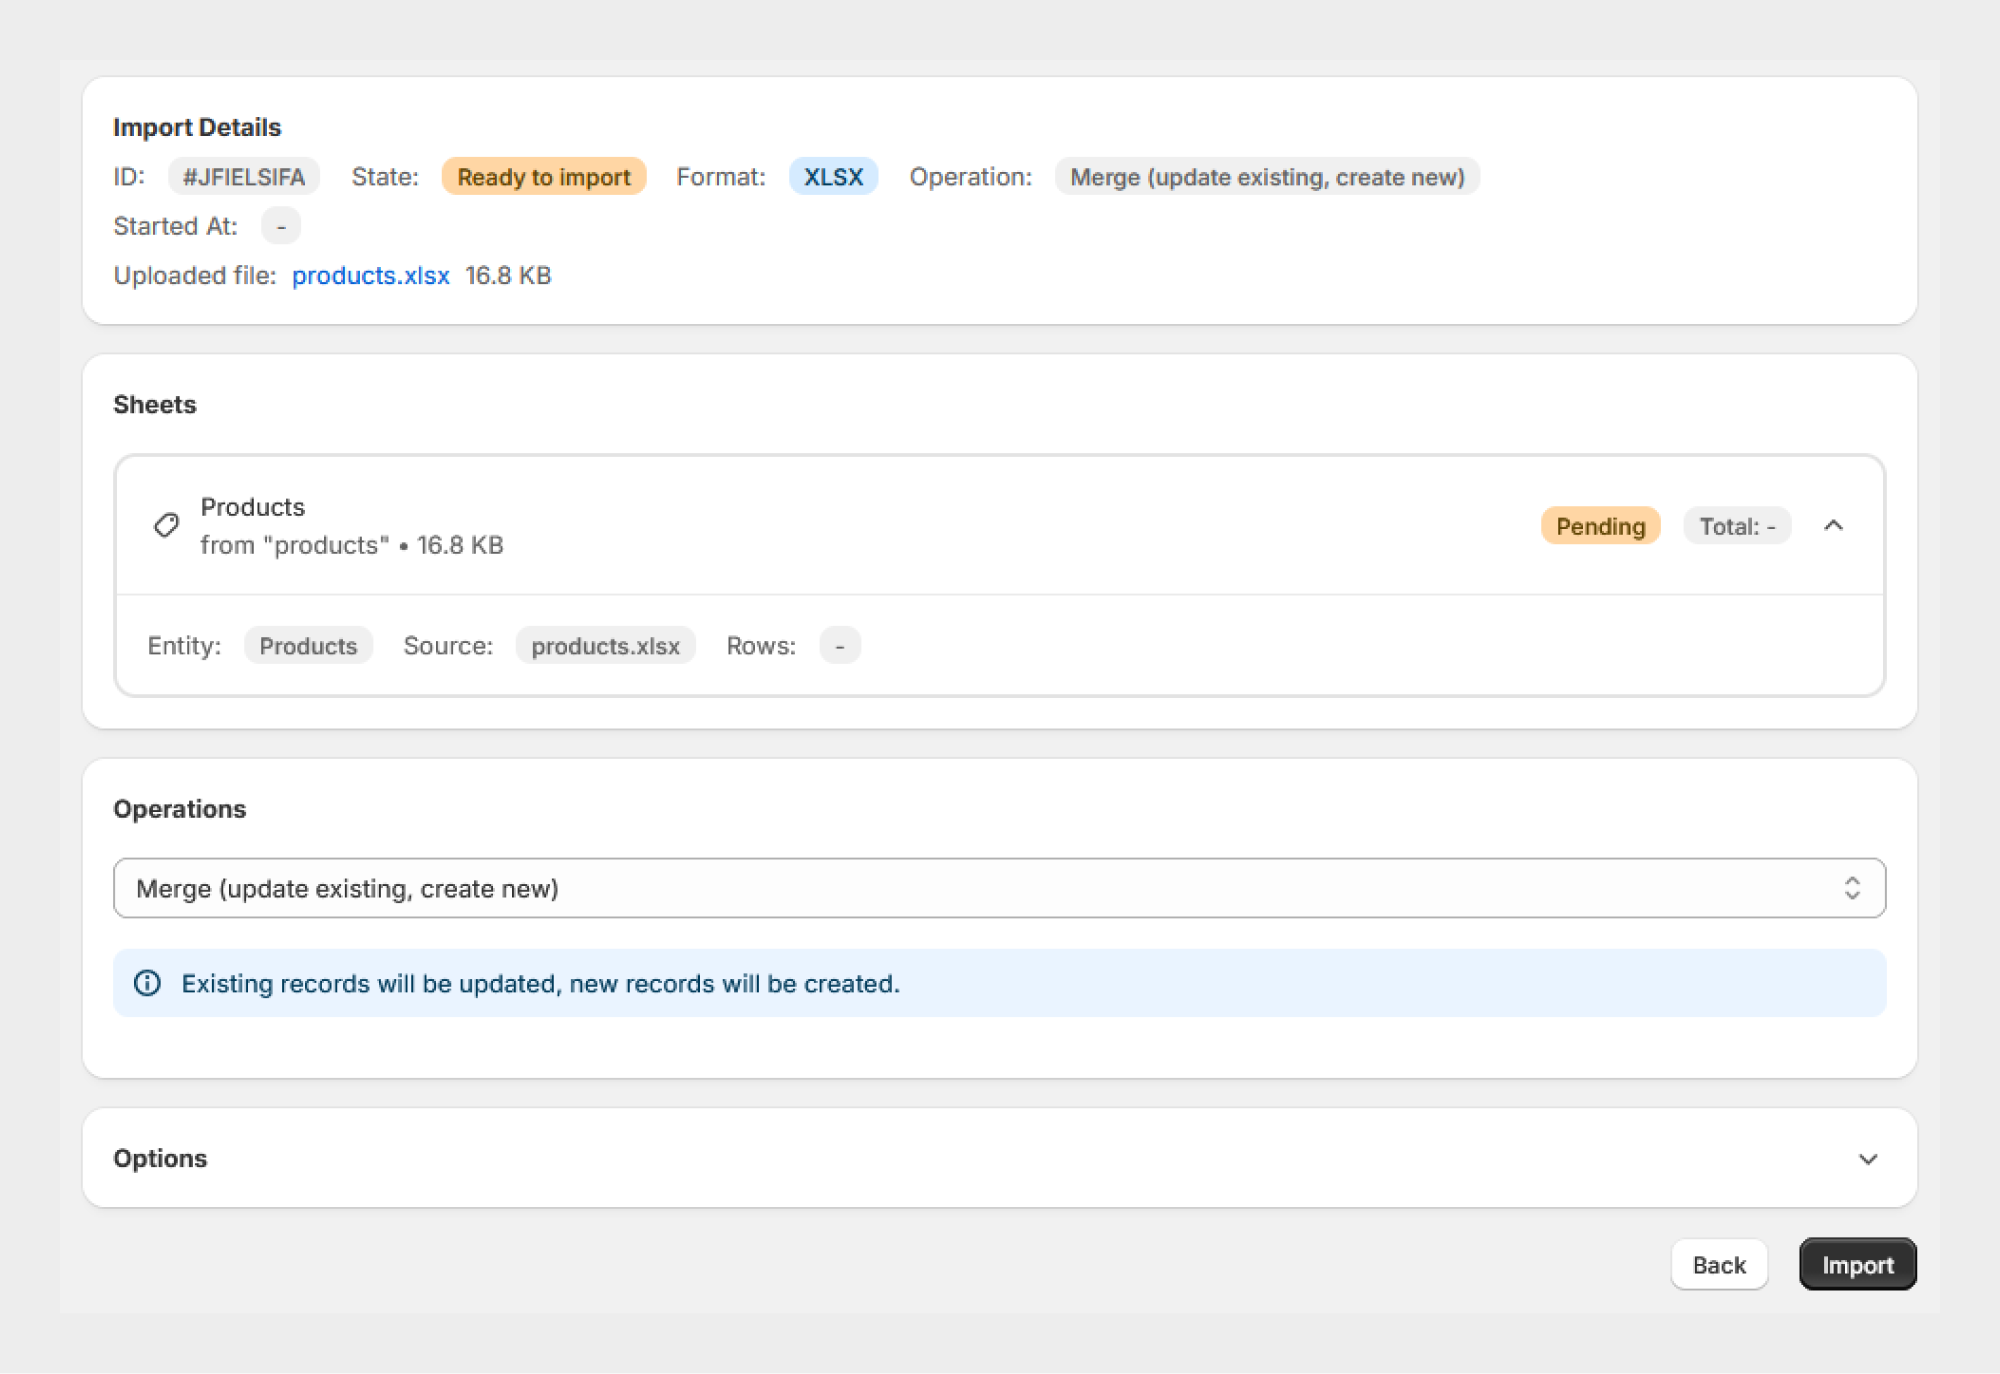
Migrato will begin processing the product import according to the selected operation and configuration.
Step 7: Monitor the Import Job
After starting the import, Migrato processes the product records and updates the import job status.
You can monitor the job from the import details page and review the processing information for the Products sheet.
 Install Migrato free
 Free plan forever